burnt toast

Category: Breakfast

The Carroty Smoked Salmon Alternative

IMG_7990

Look who’s here. A third of a year later. Look at me just waltzing in like I’ve had the busiest four months in my life. Ha! Whatever. My attempts for 2016 have been abysmal, so I can’t make any promises, but I shall attempt to better myself on the “cooking, holding off the eating part, photographing, and then, once that’s done, and only then, eating” -front. Let me introduce you to my first attempt below.

I may not get out much, but I feel that I am speaking truthfully if I say that I have yet to meet someone who doesn’t like smoked salmon (food-group avoiders/haters, you are exempt). It’s what people whip out to up their brunch game, or to add some glam to their last-minute assembly of party canapés. As soon as there’s smoked salmon anything, people lose their shit and will leave said event with the best memories ever, for life. Good for them. That’s how it should be I reckon – simple, elegant, crowd-pleasing, delicious. And unforgettable. But you know what? I fucking hate smoked salmon. There, I said it. For years I have tried to fall in love with that stinky oily rag of sea creature, but deep down I’ve always known that there’s no way in hell I will ever grow to love that stuff. So instead, I compromise and eat it anyway, because there are worse things in life(definitely better ones, too), and the lovely people offering it to me only mean well. And to be honest, I love how smoked salmon is used, especially the ultra clichéd cream cheesed and capered baguette sliced variation. Again – simple and fancy. I was actually slowly getting to terms with the “either eat and slightly regret or admire from afar and feel sad” relationship I was forming with it, when I accidentally tripped over a vegan youtube channel that had some pretty interesting ideas about smoked salmon alternatives, ones that for once weren’t of the tofu / tempeh / seitan variety. Hurray! I decided to try out the recipe, and try it I did. And you know what? I’m really into it.

IMG_7991.jpg

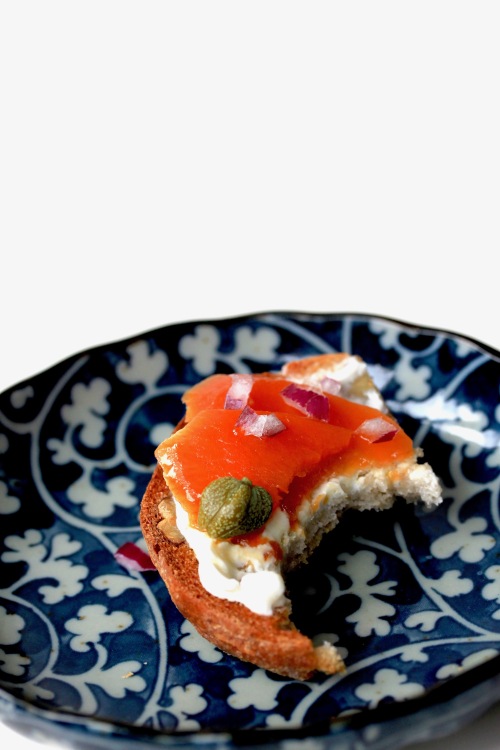
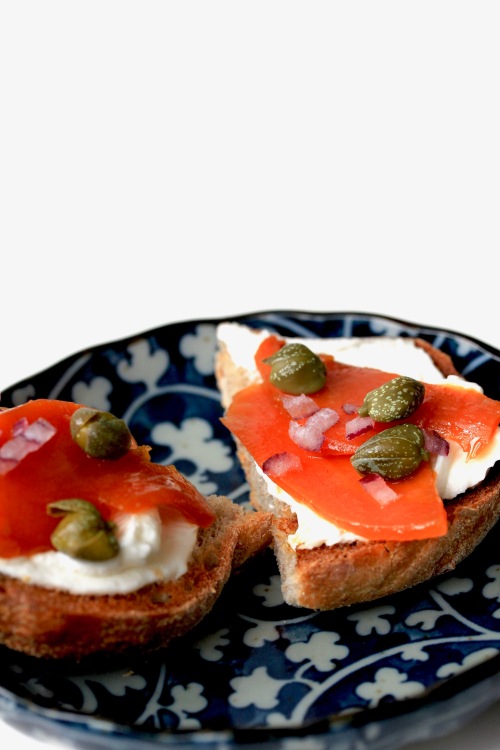
Roasted carrots people! What a versatile vegetable. Marinated for a day or so, then used the same way as salmon would be. It even looks a bit like smoked salmon. Those of you who love the original, you will most probably be disappointed, so maybe don’t make this. However, everyone else who has the same complicated relationship with pungent sea dwellers as I do, venture forth.


Roasted Marinated Carrot to Use as a Delicious Topping

or

The Carroty Smoked Salmon Alternative

(titles aren’t my strength today, soz)

This can be adjusted to however much you want to make, but I’d start off with the amount below, just in case you decide that you are not a roasted marinated carrot person


2 medium-large carrots, peeled

a little olive oil

salt

tin foil


2 Tbsp olive oil

1 Tbsp lemon juice

1 Tbsp soy sauce

2 pinches smoked paprika


Preheat the oven to 180°C. Rip off a nice-sized sheet of foil – you’re going to make a little carrot package out of this, so make sure there’s enough of it. Drizzle the middle with a teensy (1 tsp) bit of oil. Plonk the carrots on top and turn them a few times so they’re oiled all over. Sprinkle over the salt, then wrap it up tightly, rolling up the edges to form a nicely sealed bag. Place it into the oven and roast for about 45 min – 1 hour. Check on it after 30 min to see how they’re going. You don’t want the carrots to brown!

Once they’re nice and soft when tested with a knife, take them out of the oven and let them cool in their tin bag. When they’re room temperature, grab a big jar or container and combine the remaining olive oil, lemon juice, soy and smoked paprika. Thinly slice the carrots at an angle and transfer them into the jar and close the lid. Give everything a nice shake and put it into the fridge. Leave it for at least half a day before garnishing your toast with it.

I love this the classic way with a shmear of cream cheese and a sprinkling of red onion and capers, but please, do whatever you want with it.

Advertisement

Berry Bircher Muesli with Toasted Walnuts

img_7926
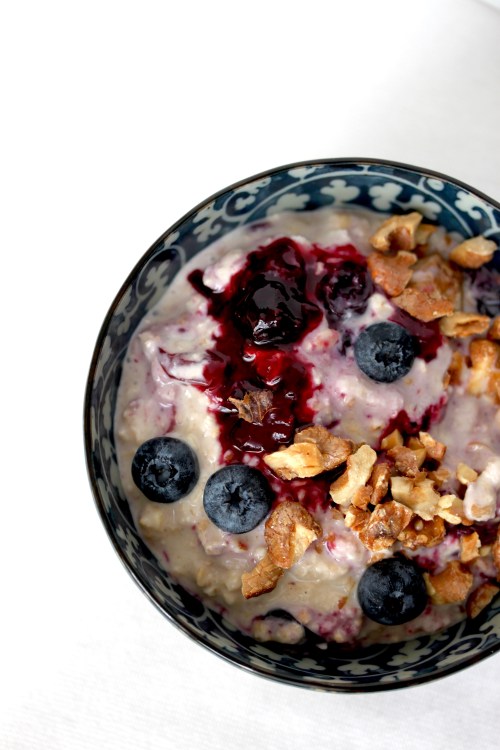
Oh hey kids. Ready for some super delicious, comforting breakfast fare? Then read right on. A well-known Swiss staple, folks eat it in all kinds of combinations at all times of day, knowing that besides Rösti and Fondue, this too will give them enough stamina to wrestle a herd of cows any day. The exciting lives we lead, people.

In all honesty, and I do say this a lot, this might be my favourite version ever. I’ve had my fair share over the years and can give you a few pointers of what I think should be included (or excluded):

  •  Always add a grated apple. And try to let it sit overnight. It sort of melts into the mixture by the following day, and forms a lovely flavour base together with the dates.
  • Only add fresh fruit when ready to serve, or else make a compote or jam. I hate fresh fruit going mushy, but I do like the flavour they add. To intensify this flavour, compote is the way to go.
  •  If adding nuts, roast them and do so at the end as well. Soggy blandness is never the answer.
  •  Don’t go crazy on the sweetener at the beginning. The rest of the ingredients will omit their own share of sweetness during the resting period, so let them do that first. You can always add more later.
  • Stick to only a small number of different fruit, about 2-4, but don’t add anything ridiculous like kiwi fruit or pineapple. This isn’t a fruit party.
  • And last but not least, add that pinch of salt, to everything, always. It makes it taste so much better.


Berry Bircher Muesli with toasted Walnuts

Serves 4 – This’ll keep nicely in the fridge for a few days. Just give it a good stir when you get it out.

150g instant oats

350 ml full fat milk

350g plain yoghurt

2 Tbsp cream or sour cream (optional)

1 Tbsp maple syrup or honey

½ tsp ground cinnamon

1 pinch of salt

1 large apple, grated (with skin on)

6 dates, quartered and chopped into small pieces

20g (small handful) of cranberries, roughly chopped


200g berries, I used blueberries and strawberries, chopped if needed

2Tbsp raw sugar

¼ tsp vanilla essence


100g walnuts

1-2 Tbsp maple syrup or honey

sprinkling of salt


more berries, to serve


This is best made the day before, or at least two hours in advance, so plan accordingly.

Get a big container that comes with a lid and combine the oats, milk, yoghurt and cream in it. Give it a good stir, then add the maple syrup, cinnamon and salt, as well as the apple, dates and cranberries. One last stir, then pop the lid on and transfer to the fridge.

In the meantime, combine the berries with the sugar and the vanilla in a small pan. Cook over low heat until it starts to thicken into a delicious smelling, syrupy fruit jam. Remove from the heat and pour into a little jar. Let it cool at room temperature before screwing on a lid and packing it into the fridge to join his oat friend.

Preheat the oven to 180°C. Line a baking tray with baking paper, and add the whole walnuts, spacing them out. Bake for about 5 minutes, then drizzle over the maple syrup and sprinkle over the salt. Give it all a good stir, then return to the oven for about 10 more minutes – you might need less, so keep your eyes peeled. The nuts are good when they have taken on a slightly darker colour, and the maple syrup has more or less “evaporated”. Remove from the oven and cool. Chop into small pieces and transfer to another jar.

A couple of hours or even a day later, Take out your oats. Give them another stir before adding the berry jam and about half of the nuts and most of the fresh berries. Gently combine them so that you can still see a few streaks of purple from the berry jam. Top with the remaining nuts and whatever berries remain. Eat.

img_7935

Yes, I really love using this bowl. And no, unless you gift me with a better option, I won’t stop using it in my shoots.

Quinoa – It’s come this far

quinoa and sweet potato patties

I like food that triggers emotion. The nostalgia a slice of good, crusty bread evokes within me, transporting me back to the magnificent bakeries of Bern. The tango of crunchy, creamy, salty, and sweet of a Greek salad, winking at you with all its healthy colours screaming “Eat me! I’m good for you!” Or the guilty decadence that comes with eating something rich and chocolatey, the guilt that over the years of consumption has turned into pleasure with a hint of satisfaction. Quinoa did none of these things to me. On the rare occasion I’d be eating it I’d question it’s validity, how serious this grain was about its super powers, because in all due respect, taste-wise, it gave me nothing.

However, being the flexitarian that I am, it seemed almost ridiculous not to give it and its complete protein and minerals a fifth chance. Apparently, we all seem to need more quinoa in our lives, so who am I to argue. Even though I’m incredibly hesitant to hop on that superfood bandwagon everyone’s been going nuts about, because, you know, it’s not really my style. I don’t follow trends. I will not admit defeat, I’m too proud. But I will admit that I’m still getting over how good these little suckers taste.

quinoa times


Quinoa and Sweet Potato Patties

Makes 9

1 medium sweet potato

2 fat garlic cloves, unpeeled

½ cup quinoa

1 bay leaf

pinch of cinnamon

vegetable stock granules, or salt, for purists

1 Tbsp white miso

¼ cup pumpkin seeds

Preheat the oven to 200°C. Line a baking tray with baking paper. Chop the sweet potato into 2cm cubes, and place them into the baking tray, tossing them with a glug of olive oil, and finishing with a sprinkling of salt. Wrap the two garlic cloves in aluminium foil and pop next to the sweet potato cubes. Roast for about 20 minutes or until the sweet potato is soft. Remove from the oven and cool.

In the meantime, soak the quinoa in ¾ cup water in a saucepan for 15 minutes. Add the bay leaf and cinnamon and bring to the boil. Simmer for 20 minutes, then cover and let steam until all the liquid has evaporated and the grains are nice and fluffy.

Toast the pumpkin seeds in a pan until they’ve all puffed up. Let them cool, than whizz them up to a fine powder in a blender. Stop before they turn into a paste.

To assemble, remove the bay leaf from the quinoa. Add the mashed sweet potato, the ground pumpkin seeds, the miso and as little or as much vegetable stock granules or salt as you think is right. Give it all a nice good stir, then, with wet hands, form into patties. Heat a frying pan with a splash of olive oil and fry those cuties until golden on each side. Done. I usually have them with some crumbled feta and a few chopped parsley leaves, sometimes even a fried egg. Best breakfast ever.

If you don’t feel like cooking them all at once, they’ll keep in the fridge for a few days.

Rösti

brunch rösti

I feel like I owe you something pretty. And I think this image pretty much fulfills the absence of pretty pretty well, yeah?

Listen I don’t want to go on about my Swiss heritage and about how obsessively frequent we like to eat rösti (we don’t), but I would like to say this. Rösti is awesome, and it makes the world a better place. I’m particularly partial to the smaller, bite – sized version, not only because of its visual appeal, but also because of the crunchy exterior to inner softness –ratio. And because they look incredibly cute with stuff stacked on top of them, for brunch or indeed some shmancy themed dinner party. Just recently a friend of mine was so kind as to give me a couple of his quails’ eggs. As a result, these decadent brunch röstis came to be.

Brunch Rösti

Makes 12

2 medium potatoes

1 leek (250g), sliced into 2cm rounds

2 heaped Tbsp butter

80ml crème fraîche or sour cream

1 Tbsp seeded mustard or to taste

salt

6 quail’s eggs

a few sprigs flowering thyme, or some other tiny herb you like

cracked black pepper

You’ve got to start making these a little in advance, because you’ve got to boil the potatoes and make the leek confit first.

Pierce the potatoes with a knife all around to speed up the cooking process, then place them in a saucepan and top with water from a recently boiled kettle. Cook until soft, then drain. Cool.

In the meantime, melt the butter in a small saucepan on low heat and spread the rounds of leek out so the bottom is covered. Sprinkle over a pinch of salt.  Cover with a lid and on the smallest flame possible, let the leek simmer in the buttery goodness until soft. Stir as seldom as possible, because you want the leek to keep its shape. Once it’s done, remove from the heat and transfer to a jar. You know what you’ve just made? Leek confit. Pretty nifty, eh? This will keep for a week or so in the fridge. But I honestly don’t know who would wait that long.

Get your potatoes and grate them. Don’t bother with removing the skin, it’ll come off while you’re grating it. Divide the potato into 12 portions and shape into rounds. Heat a large fry pan with the bottom covered with olive oil and add the potato rösti. You might have to do this in batches okay? Don’t move them too early or they’ll fall apart. Once they’re golden on one side, flip them to get the other side done. Line a plate with some paper and transfer the rösti onto it to cool.

Next, combine your crème fraîche with the mustard and season with some salt, then set aside while you boil the quail’s eggs. I usually place them in the bottom of a pan and pour over some boiling water to cover them, then set the timer. The egg in the picture was in there for 3 ½ minutes, but I reckon 2 ½ would probably be even better, for a still slightly gooey yolk. When done, pour off the water and top with cold tap water. Once they’re cool enough to handle, peel the eggs and slice them in half.

Now, assembly time. Start with one rösti, top with a dollop of crème fraîche, leek and half an egg. Get your pretty herbs out and sprinkle that and a bit of cracked pepper on top. Repeat with the rest, then eat.

Just looking back over the recipe, it looks incredibly long, doesn’t it. It’s not complicated though. I just thought I’d throw in some extra detail there, just in case you forgot how to boil a potato or peel an egg. I just care about you kitten, that’s all.

Mailänderli

mailänderli

My general attitude towards heart-shaped things is “Can you go and be kitsch somewhere else please?  It’s making my face ache. With disgust.”

I’m sorry if we don’t share the same outlook on life, but hey, more giant squidgy I-Love-You – holding teddy bears for you. I mean, someone’s got to take them.

However! There’s always a however. These biscuits are an exception. Why? Nostalgia and childhood memories my friend. This one is for you, fellow expats. For all those fondly reminiscing the tins upon tins of delicious Christmas bickies.

Nobody can make a biscuit quite like the Swiss.

Oh it’s not Christmas? Christmas is just an excuse to make biscuits. I don’t need an excuse.

So let me introduce you to the humble Mailänderli. A plain, simple, buttery little thing, with a golden lacquered top with a faint whiff of citrus. A general all-rounder, this biscuit fits perfectly into the breakfast category, best with a cup of milky tea.

cookie sheet

Mailänderli


Makes about 100, depending on size


250g butter, softened

220g caster sugar

½ tsp salt

grated rind of one lemon

3 eggs

500g plain flour

1 egg yolk

1 tsp cream

With a handheld mixer, whip the butter, sugar, salt, and lemon rind until well combined and fluffy. Add the eggs, one at a time, stirring well after each one is added. Whip until the mixture turns a few shades lighter. Replace the mixer with a wooden spoon of some sort, because you’ll be adding the flour now, and you don’t want it all over your kitchen floor. Gently stir the flour into the butter mixture, until it comes together as a soft, yellow dough.

Now, divide into two and cling wrap each ball of dough and place in the fridge for at least 2 hours or overnight. I tend to put one half in the freezer, because it does make a lot.

Remove the dough from the fridge and roll out between two layers of plastic (I find a plastic bag cut in half works beautifully. That way you don’t risk your biscuits getting too floury or dry) to a thickness of about 8mm. Now it’s time to go wild with your cookie cutters. Use whatever shape you want, just be aware that you may have to adjust the baking time according to the size of your biscuits.

Lay them out on a lined baking tray with enough space between them so they can spread, and pop them back into the fridge tor 15 minutes to firm up.

In the meantime, whisk together the egg yolk and cream, and preheat the oven to 200°C. When the Meiländerli are ready to come out of the fridge, get one of those kitchen paintbrushes and  paint the top of each of them with the egg yolk mixture. Whack them in the oven for about 10 minutes until slightly golden. Whatever you do, keep an eye on them, because they like to be sneaky and go a shade darker, depending on your oven of course.

Take them out of the oven and let them cool on a wire rack.

They’ll last for a couple of days in an airtight container.

%d bloggers like this: