burnt toast

Category: Sweet

Pears

roasted caramel pears

Dylan Moran once said “You can get addicted to anything, except for fruit.” I wholeheartedly agree. Fruit’s alright. But I never crave it. There are no wistful daydreams about ruby red apples, no heated discussions on when to buy the ripest mangoes, and certainly no long and lonely nights of clutching the doona tightly, thinking naughty thoughts about sliced watermelon. It just isn’t like that. I will just briefly not that I have been forcing myself to up my fruit intake, just so that my conscience will shut up and let me have an extra chocolate, after I’ve eaten my nectarine. Fruit is alright. Just don’t get me started on fruit salad again, because we all know that it turns me into an irritated opinionated brat, and that’s not what we want now, is it.

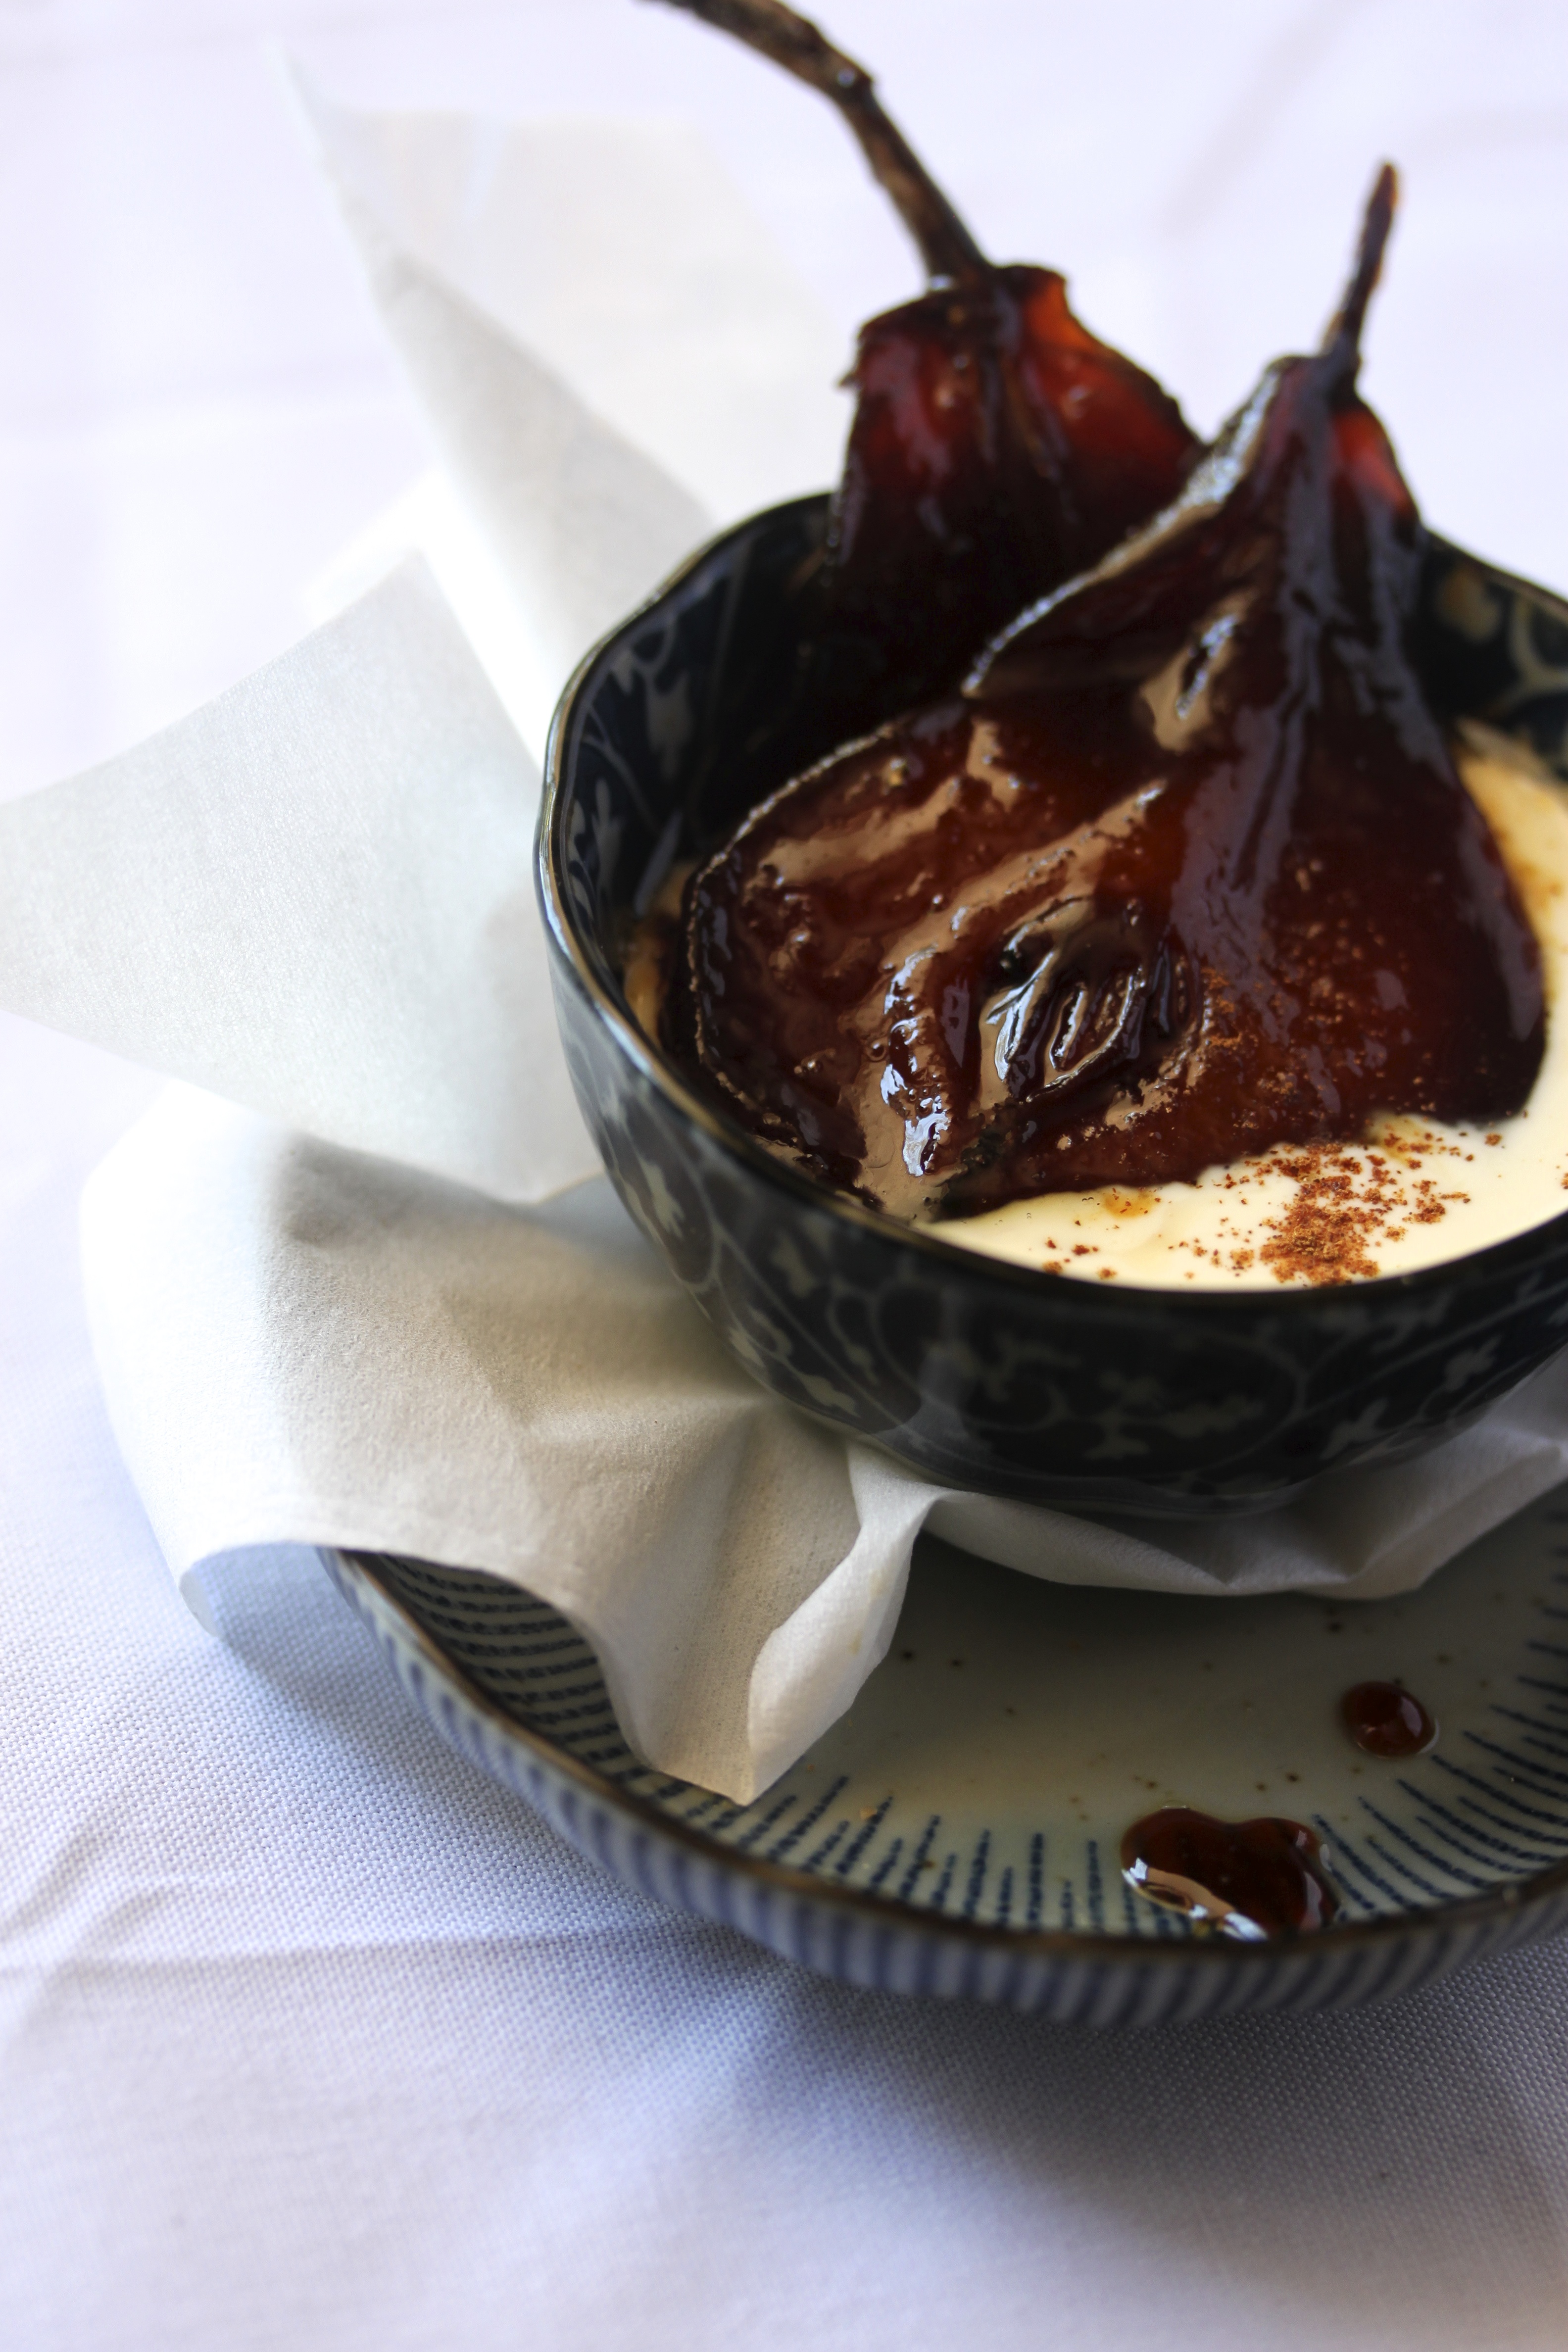
One way to make fruit desirable is to disguise it. I’m not talking about the spinach and beetroot brownies or the avocado chocolate mousse here. I’m talking about obvious disguises, namely sugar. Sexy delicious sugar. Give me some pears and some caramelised sugar and let them tango in the oven for a few hours. Now that’s what I call natural beauty. Gleaming little globes of almost translucent auburn-coloured pears, enrobed in rich layers of cinnamony caramel, which upon contact with the cold creamy ice cream (which you will hopefully eat it with) turns the experience into a chewy mouthful of wonderfulness.

Roasted Caramel Pears

Serves about 6

6 firm, ripe pears

1 lemon

440g caster sugar

250ml water

¼ tsp salt

1 cinnamon stick

2 Tbsp butter

1 Tbsp vanilla essence

Preheat your oven to 160°C. Peel the pears and cut them in half lengthways, keeping the stems intact. Don’t remove the core and seeds.

Place the pear halves in a large bowl and squeeze over the lemon. Toss the pears and cover with cold water. This will keep them from browning.

In a large heavy saucepan, combine the water, sugar and salt and stir over a high heat until the sugar dissolves. Add the cinnamon stick and bring to the boil. Let it boil, untouched, until the colour starts to take on a light golden hue. Watch closely please, okay? We all know how quickly sugar can turn on us. So after about 8 minutes of staring at the pot, which feels like an eternity, but be patient, you should have a lovely golden caramel, smelling deliciously of cinnamon. Quickly remove from the heat and stir in the butter and the vanilla.

Remove the pears from their lemon bath and place them cut-side-down on a large baking tray. Pour over the caramel. It will have thickened again, but don’t worry, this will change again shortly. And also, add the cinnamon stick to the pan. The longer it hangs out with the caramel, the better. Put the pan in the oven and as soon as the caramel starts to melt again, spoon over the pears. Repeat this every half hour for the next 4 hours. The pears are ready when they are an even colour all the way through and have become slightly transparent. They will also have shrunk quite a bit, which is great – an excuse to eat more of them then. Serve them warm with the caramel drizzled over the top, with cream or ice cream.

You can refrigerate them in their sauce for up to 4 days and just reheat them in a warm oven, but seriously, who keeps desserts for that long?

Advertisement

Kulfi time

cardamom pistachio kulfi

When I was in high school, my mum and I had a Friday evening tradition of going to our favourite Indian restaurant for dinner. Amongst many other places, we’ve been to India three times together, and I will say without a smidge of shame that one of the main reasons that made us keep wanting to go back was the food. The history and the culture and all that amazingness too of course, but man, that food.

This is possibly my favourite Indian dessert, although I’d rather not have favourites. To all you kulfi-novices-soon-to be-onverted out there, kulfi is a type of ice cream. It is prepared by evaporating sweetened and flavoured milk by slowly cooking it, until it has reduced considerably in volume and has thickened in consistency. This deliciousness is then frozen in little moulds and then people like me stuff their faces with them.

Without further ado, make this, now. Especially if you’re in Melbourne and sweating yourself senseless. Or because you just think you need to impress the pants off yourself.

By all means, replace the milk partially or fully with cream. I’ve just always done it with milk. And basically it’s just a very rare occasion where I find half a litre of cream in my fridge looking at me with big eyes, begging to be made into ice cream. But then again, the dairy section of your fridge might be different.

Cardamom and Pistachio Kulfi


400ml mi full cream milk

10 cardamom pods, seeds removed and finely ground

1 big pinch of salt

1 can/379g condensed milk

1 can/354ml evaporated milk

50g pistachios, finely chopped

Combine the milk, the cardamom and the salt in a small saucepan and slowly bring to the boil. Remove from heat and pour into a large square plastic container. Whisk in the condensed- and evaporated milk. Let it come to room temperature, or if your as impatient as me, immediately stick it in the freezer. Every half hour or so, whisk the mixture with a fork so as to break the ice crystals, you know the story. After about 4 hours or more, depending on how good your freezer is, your mixture will have the consistency of slushy snow. Now stir in the pistachios and fill into whatever mould makes you happy. I usually use small cups or those popsicle trays you can buy. If you’re lucky enough to have 2 of those trays, I reckon you could make 14-16. Now put them back into the freezer to firm up. When ready, hold a knife under a hot tap and slide it around the edge of each popsicle until it comes out.

Raspberry goodness

raspberry and white chocolate muffin

Hi. Yes more sweets for you today. Why? Because I think you’re too skinny. And because cake is really good for you. It’s got like berries in it, which are supposedly high in antioxidants, and there’s dairy, which contains calcium, which everybody knows is good for your bones and stuff. Just watching out for ya love. I know, I know. I would think I was an awesome friend, too. And look, I made twelve individual “cakes,” because I know you and your conscience too well and I wouldn’t want you two getting into a quarrel now.

half left

But now, on muffins quickly – because after all, I’m giving you yet another awesome recipe and I think I should explain why exactly. I’m sure I’m not alone in this when  I say I like the top the best. But only if it’s crunchy, with light but moist buttery crumb. And the caramelised morcels of white chocolate, well they’re just a bonus.

The reason why I’ve stared including cups as measurements is because I currently don’t own any kitchen scales. And because It’s easy. Just thought I’d let you know.

three muffins

Raspberry and White Chocolate Muffins

300g / 2 cups plain flour

3 tsp baking powder

½ tsp salt

220g / 1 cup caster sugar

220g butter, cut into cubes

125ml / 1/2 cup buttermilk

2 tsp vanilla essence

1 egg

250g / 2 cups frozen raspberries, ½ cup set aside

200g white chocolate, roughly chopped, 1/5 set aside

icing sugar, to dust

Preheat the oven to 180°C. Line a muffin tin with muffin cases or squares of baking paper.

In a large bowl, combine the flour, baking powder, salt and the sugar. In a small pan, melt the butter and let it cool slightly. In a jug, combine the butter with the milk, vanilla and egg, giving it a bit of a whisk with a fork. Pour into the bowl and gently stir until just combined. Stir in the berries and the chocolate. Divide amongst the muffin holes and top with the berries and chocolate you set aside. Pop in the oven for 40 minutes, or until a skewer inserted comes out clean.

Once the pretties are cool enough to handle, give them a bit of a sprinkle with the icing sugar and eat one while it’s still warm.

More chocolaty than chocolate

chocolate brownie

Ever since I can remember, I have been a worshipper of the brownie. The reason for this, as it is for many things when you are small, was because it was a special occasion thing. So from an early age, I knew. I knew what a good brownie was. It was heaven it was. It was chocolaty and delicious. This object of desire should be chewy and dense. If it needed icing someone was obviously trying to hide its lack of character. A perfect brownie must contain walnuts, as they offset its fudgy texture and cuts through the richness. Those children’s birthday buffet-style lumps of sugary brown foam, now they didn’t deserve to be called brownies.

I took it upon me to make an end to the disappointment, and succeeded. Or at least I thought so, until I stumbled upon something so very much better.

A brownie more chocolatey than chocolate. The perfect balance of fudge, chocolate chip and walnut crunch. It is beautiful. It is intense. It is the missing part of the puzzle. You will want to take it out to dinner, introduce it to your parents, and have its babies.

chocolate crumbs

Eat responsibly.

Best Brownies, Ever

This recipe is adapted from this lovely place. Check it out sometime.

250g dark chocolate

250g unsalted butter

300g caster sugar

3 eggs

60g plain flour

60g good quality cocoa powder

½ tsp salt

2 tsp vanilla essence

100g walnuts, chopped

Preheat oven to 180°C. Line a 24cm x 24cm baking tin with baking paper.

Now to end up with the perfect fudgy consistency, here a little trick. Or rather a big square ice-filled trick. Get a baking tray bigger than the one you’re using, and fill it with 2cm of cold water, and as many ice cubes as you can find. This will stop the brownies cooking any further.

Melt the butter and 200g of the chocolate in a large saucepan (this is my way of using as few dishes as possible. You’ll see how soon). Remove from heat. Stir in sugar. In a jug, whisk eggs with a fork, then slowly incorporate into the chocolate mixture. Stir in the flour, cocoa powder, salt and vanilla, then add the remaining 50g of chocolate, which you have finely chopped, and the walnuts. Give it a nice good stir and then pour into the prepared tin. Bake for 35 minutes, but start checking at 30, because the last thing you want is a cakey brownie. When tested with a toothpick, it should come out sticky, but not coated with raw mixture. Take the tin out and place it into the prepared water bath. Leave them to cool for about an hour before cutting them into squares. Little sqares. That way you can have two.

Vanilla

vanillekipferl

Once upon a time, far far away, there was a little girl that lived in Switzerland who loved Christmas. Every year she’d look forward to lighting the advent wreath, to baking cookies with her mum, to opening the Christmas calendar and to decorating the the cute little pine tree she had helped to pick at the markets. Then, if she was lucky, Santa and his donkey would come by and give her a little bag filled with juicy mandarins, chocolates and peanuts. And then finally, Christmas Day arrived, where she and all the other little children were smothered with gifts, while their families and relatives happily sat by, singing Christmas carols, while the snowflakes outside silently covered the rooftops and footpaths. That time of year was just magical.

On the other side of the world, quite a few years later, this now not so little girl is sitting on the veranda, covered in sunscreen with a cold drink next to her, wishing for the life of her that it will soon be January. No matter how many cute little Father Christmas-hat – bearing wallabies she sees, she is incapable of taking on the Christmas spirit. It’s just too fucking hot.

So reminiscing the past, Switzerland, and snowy Christmas days, here my favourite biscuit recipe. May you too have an awesomely hot/cold/dramatic Christmas, and may we perhaps one day meet on a cold and snowy night to bake biscuits. Merry merry.

Vanillekipferl


I am not much of a biscuit person, so it means quite something that I’m giving you a recipe for some here. They are beautifully simple vanillary melt-in-your-mouth shortbread-style mouthfuls of pleasure.

Makes heaps (or about 4 baking trays worth)


500g plain flour

½ tsp salt

300g icing sugar, plus extra to decorate

400g cold butter, cut into cubes

4 tsp vanilla essence

1 vanilla bean, seeds scraped

200g ground almonds

2 egg yolks

Combine the flour, salt, and icing sugar in a big bowl. Next, add the butter and rub it into the flour until it resembles coarse sand.

Add the rest of the ingredients and knead into a soft dough. Cover with clingwrap and chill for at least 30 minutes.

Preheat oven to 200°C. While keeping the dough as cool as possible, shape it into finger – thick sausages. Cut these into 2cm lengths, and roll them into “horns” or bananas or waxing moons or whatever you feel like calling them at that precise moment. Place them on a baking paper – clad tray and bake them for 10 – 15 minutes – they should barely have taken on any colour. A golden hue is perfect.

While the bickies are still warm, turn the biscuits in a plate filled with icing sugar. Once they’re cool, you can always sprinkle on more.

Great with a cup of Lady Grey tea.

Carrot Cake

So what are you, a cake or a biscuit person? This is pretty vital for our relationship, so be honest, okay. It’s like the dog or cat question. This will either deepen our friendship or make it disappear in a puff of orange smoke. Yes orange. I’m a cake person, through and through. But if I’m really honest, I’m actually an icing person. Cream cheese icing. Hells yeah. It’s the most important part of the cake.

I don’t care much for chocolate cake, unless it’s in brownie form. Cake needs to be fluffy and moist – none of that airy dry, crap, but also not too moist, because then it will become extremely heavy, like those vegan gluten-free sugar free bricks you find at the health food shop. Carrot cake is not supposed to be health food. It’s supposed to be cake, it says it in the name. Also, there is no way you will find raisins in my carrot cake, they just ruin it. And this cake is best for breakfast. Or lunchtime with champagne. Because carrot cake, my friend, is awesome, and it doesn’t need a special occasion.

The Best Carrot Cake

This recipe is adapted from Leila Lindholm’s cookbook, „Backen mit Leila“. Fabulous book, you should get it.

150g softened unsalted butter

240g caster sugar

3 eggs

2 pinches of salt

1 ½ tsp vanilla essence

1 ½ tsp cinnamon

1 tsp ground cardamom

½ tsp ground ginger

180g plain flour

3 tsp baking powder

300g finely grated carrots ( about 2 ½ large ones)

100g roughly chopped walnuts

70g softened unsalted butter

320g Philadelphia cream cheese

1 1/2 tsp vanilla essence

1 lime, finely grated rind and juice from one half

100g icing sugar

Preheat the oven to 150°C degrees. Line a 24cm baking tin with baking paper and set aside.

In a big bowl, beat the butter and the sugar until light and fluffy. Add the eggs, one at a time. Beat in salt, essence and spices. Add the flour and the baking powder and mix well. Beat in the carrots, then the walnuts.

Spread into the tin. The batter will be nice and thick thus easy to spread. Let it bake for 55 minutes or until golden and a skewer inserted comes out clean. Let it cool.

In the meantime, beat the butter and the cream cheese fort he icing. Add the vanilla, the lime and the icing sugar and beat until fluffy.

When the cake has cooled, spread the icing over the cake. Get a knife and cut yourself a piece, you’ve deserved it.

By the way I’m a cat person, albeit a strange one. See, some cats don’t like me. And sometimes, very very rarely, I have been known to like dogs. But only if they tapdance.

Cheesecake

Look, I baked you a cake. Nice of me isn’t it? That’s because I love you. And because I just can’t eat a whole cheesecake by myself, I need help in sharing the calories. That’s what true friends are for.

Cheesecake was a coming of age thing for me. Like wine or maybe even blue cheese for some, it took me a good long time to get used to. Maybe because what I grew up with in Europe was nowhere near as good as what I’m getting my teeth into now. Mind, it has to be worth it. If I’m going to eat a piece of cream cheese as big as a brick I want to taste the calories please. I want to taste every gram of guilty pleasure. I want it to be creamy, silky and smooth, with a deliciously buttery base. Because life’s too short.

 Cheesecake of Cheesecakes

2 Tbsp caster sugar

150g frozen raspberries

500g granita biscuits, roughly crushed

200g salted butter, melted

750g cream cheese, softened

250g sour cream

330g caster sugar

1 lemon, juice

finely grated rind of half an orange

1 Tbsp vanilla essence

½ vanilla bean, seeds (if you can afford it – I just think the little black dots elevate it from great to sexy)

4 eggs

combine the sugar and the raspberries in a small saucepan and stir over low heat until sugar is dissolved and raspberries are soft. Remove and pass through a sieve. Set aside.

Preheat oven to 200°C. Grind the biscuits to a fine powder and combine with the melted butter. Line the base of a 24cm tin and add crumb mixture, patting it firmly into the base and up the sides. Bake in the oven for 10 minutes. Remove and reduce heat to 150°C.

Beat cream cheese until creamy. Add the sour cream, the sugar, the juice, rind and vanilla and keep on beating until the sugar is dissolved. Add the eggs, one at a time, until you’ve got a volumtiously creamy cheesecake filling in front of you. Resist the urge to eat it all and spoon into the cooled baking tin. Draw a few swirls with the raspberry sauce on top of the cheesecake filling and make it look fancy by pulling the back of a spoon through it. Or just leave it. But I like fancy.

Place into the oven. Place a baking tray beneath it, and fill it about halfway with some water. This is the secret to the cheesecake’s dreamy texture, promise. Make sure you top it up if it runs low during the baking process.

So now, bake this little gem for 1½ hours. Then take out of the oven, cool, and keep in the fridge for a few hours or over night.

Serve it cut into thin slices with a few dabs of the remaining raspberry sauce and a scattering of raspberries. And if you still feel guilty (you sinful person you) then run around your house five times. Done. Time for another slice.

Chocolatiness

I like brownies. I like them a lot. So do you. Especially with walnuts and big chunks of dark chocolate. Or blonde with toasted macadamia nuts and raspberries. Yum right? I like them dense and chewy, especially out of the freezer. Sounds weird? Have you ever had a frozen mars bar? I needn’t say more. The thing with these brownies here is that they’re a winner in the fancy dress department. All dark and mysterious with a lacy ribbon of creamy white goodness, flirtaciously inviting you to take a naughty bite.

Cheesecake Brownies

200g unsalted butter, diced
100g good quality 70% dark chocolate, chopped
200g dark chocolate melts, chopped, half set aside
3 eggs
250g caster sugar
½ tsp salt
1 tsp vanilla essence
115g plain flour

250g cream cheese, softened
80g caster sugar
2 tsp vanilla essence
1 egg

Preheat oven to 180°C. Line a 24 x 24cm tin with baking parchment.

Melt the butter and the two types of chocolate in a saucepan over low heat. Set aside.

In a bowl, beat the cream cheese with an electric mixer until creamy. Add the sugar and the vanilla and beat until the sugar has dissolved. Add the egg and beat until thoroughly combined. Set aside.

In a jug, whisk the eggs, the sugar and the salt until the mixture lightens to a creamy custard colour. Pour into the slightly cooled chocolate mixture and stir until combined. Add the flour, then the chocolate. Once it looks all delicious and glossy, pour half into the prepared tin. Make sure you scoop out some of the chocolate bits from the pan, as they tend to sink to the bottom. Now dollop the cheesecake mixture over the top, as regularly or irregularly as you like. Cover with the rest of the brownie batter. Send the tin off to oven land for about 40-55 minutes, checking after 30 mins to see where the giant brownie is up to. A skewer inserted should not come out clean, rather stickily covered in crumbs. Then, remove from the oven and cool. It will continue to bake once out of the oven, so don’t be afraid of taking it out too early.

Don’t eat this still warm. It’s best cold, or frozen. With a cup of tea. Or ice cream. Or for breakfast. Or instead of dinner.

%d bloggers like this: