burnt toast

Category: Savoury

Cabbage, Carrot and Crispy Fish Tacos with Chipotle Mayo

IMG_7999

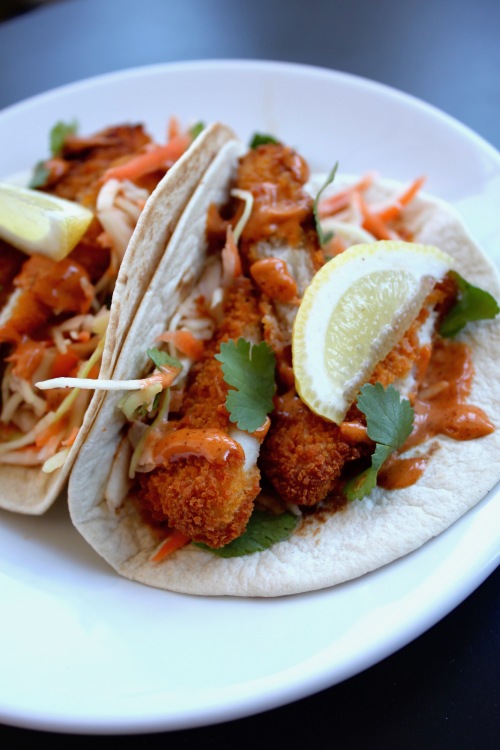
I’ve been making this recipe for a good year now, and I’ve been making it at least once a month. It’s stupidly easy and delicious, as any good taco should be. It’s also the home diy version of this incredibly fantastic one you can get at Los Hermanos in Brunswick, Melbourne (miss you), if you’re ever there.

Again, this is one of those “throw together / non-recipe” recipes, but it’s nice to have some sort of instructions, so here they are. Go forth and adjust and enjoy as needed.


Cabbage, Carrot and Crispy Fish Tacos with Chipotle Mayo

Makes 4


6 fish fingers (you can go as glamorous or as childhood nostalgic as you like here)


150g white cabbage, thinly sliced

1 medium carrot, grated

½ bunch of coriander, leaves picked, roughly chopped

salt


5 Tbsp mayonnaise

½ tsp chipotle

½ tsp smoked paprika (you can go all chipotle here if you like it super spicy)

½ tsp honey

2 tsp soy sauce

2 tsp water, to thin it and make it easier to drizzle


4 small (mini) flour tortillas

a few wedges of lemon, to serve


Preheat oven to 200°C. Add the fish fingers and leave them for about 20-25 minutes – you want them to be super crispy. Alternatively, heat some oil in a pan and transform your place into a deep-fry venue.

In the meantime, combine the cabbage, carrot and coriander with a pinch of salt. I find this helps soften the cabbage, making it not only easier to eat, but also less bland.

Combine the chipotle mayo ingredients. Remove the fish fingers from the oven once they are done, and let them cool a little. Once they are cool, halve them at an angle for no other reason than to make them look fancy. Skip this step if fancy isn’t your jam.

Get out a big frying pan, and heat each tortilla on each side – a few toasty spots are highly welcome here, but keep an eye on them, because they darken pretty quickly. Place one of the tortillas on a plate, add a smear of mayo, followed by the cabbage mixture, 3 fish finger halves and top it off with a drizzle of more mayo. Repeat with the remaining tacos. Serve with lemon wedges.

The Carroty Smoked Salmon Alternative

IMG_7990

Look who’s here. A third of a year later. Look at me just waltzing in like I’ve had the busiest four months in my life. Ha! Whatever. My attempts for 2016 have been abysmal, so I can’t make any promises, but I shall attempt to better myself on the “cooking, holding off the eating part, photographing, and then, once that’s done, and only then, eating” -front. Let me introduce you to my first attempt below.

I may not get out much, but I feel that I am speaking truthfully if I say that I have yet to meet someone who doesn’t like smoked salmon (food-group avoiders/haters, you are exempt). It’s what people whip out to up their brunch game, or to add some glam to their last-minute assembly of party canapés. As soon as there’s smoked salmon anything, people lose their shit and will leave said event with the best memories ever, for life. Good for them. That’s how it should be I reckon – simple, elegant, crowd-pleasing, delicious. And unforgettable. But you know what? I fucking hate smoked salmon. There, I said it. For years I have tried to fall in love with that stinky oily rag of sea creature, but deep down I’ve always known that there’s no way in hell I will ever grow to love that stuff. So instead, I compromise and eat it anyway, because there are worse things in life(definitely better ones, too), and the lovely people offering it to me only mean well. And to be honest, I love how smoked salmon is used, especially the ultra clichéd cream cheesed and capered baguette sliced variation. Again – simple and fancy. I was actually slowly getting to terms with the “either eat and slightly regret or admire from afar and feel sad” relationship I was forming with it, when I accidentally tripped over a vegan youtube channel that had some pretty interesting ideas about smoked salmon alternatives, ones that for once weren’t of the tofu / tempeh / seitan variety. Hurray! I decided to try out the recipe, and try it I did. And you know what? I’m really into it.

IMG_7991.jpg

Roasted carrots people! What a versatile vegetable. Marinated for a day or so, then used the same way as salmon would be. It even looks a bit like smoked salmon. Those of you who love the original, you will most probably be disappointed, so maybe don’t make this. However, everyone else who has the same complicated relationship with pungent sea dwellers as I do, venture forth.


Roasted Marinated Carrot to Use as a Delicious Topping

or

The Carroty Smoked Salmon Alternative

(titles aren’t my strength today, soz)

This can be adjusted to however much you want to make, but I’d start off with the amount below, just in case you decide that you are not a roasted marinated carrot person


2 medium-large carrots, peeled

a little olive oil

salt

tin foil


2 Tbsp olive oil

1 Tbsp lemon juice

1 Tbsp soy sauce

2 pinches smoked paprika


Preheat the oven to 180°C. Rip off a nice-sized sheet of foil – you’re going to make a little carrot package out of this, so make sure there’s enough of it. Drizzle the middle with a teensy (1 tsp) bit of oil. Plonk the carrots on top and turn them a few times so they’re oiled all over. Sprinkle over the salt, then wrap it up tightly, rolling up the edges to form a nicely sealed bag. Place it into the oven and roast for about 45 min – 1 hour. Check on it after 30 min to see how they’re going. You don’t want the carrots to brown!

Once they’re nice and soft when tested with a knife, take them out of the oven and let them cool in their tin bag. When they’re room temperature, grab a big jar or container and combine the remaining olive oil, lemon juice, soy and smoked paprika. Thinly slice the carrots at an angle and transfer them into the jar and close the lid. Give everything a nice shake and put it into the fridge. Leave it for at least half a day before garnishing your toast with it.

I love this the classic way with a shmear of cream cheese and a sprinkling of red onion and capers, but please, do whatever you want with it.

Cheese and Kale Pide

IMG_7693

So today I’m going to tell you the tale of this snazzy piece of ultimate comfort. It started off as the famed khachapuri, a wonderful Georgian cheese stuffed bread, ideal for accompanying anything and everything, especially soup. However, on the visual front it isn’t too much of a looker, so that’s where our trusty pide comes in. Between the two of them, pide wins all the beauty pageants because of its “I’m so much more en vogue than pizza” –presentation. The pide needed something else though, it needed something to cut through its wonderful if not sometimes slightly overwhelming cheesiness, something with a bit of bite, some garlicky, vegetably umph. Hold your kittens, make way for the kale! Here it comes, move out of the way, hail oh mighty kale! Of course I was going to put kale on my cheese pide. I haven’t written about kale for months. One crazy deficit over here.

No but for real now, this is wonderful. I absolutely love these as breakfast, but they go well with anything feast- or soup related. I personally go for a drizzle of sweet chilli with mine, but see what flavour combo works best for your tastebuds.

If you’re just after the cheese-less, round, covered version of this, i.e. khachapuri, Follow the recipe below, but instead of shaping boats, roll out two big round disks of dough, covering one with the cheese mixture, then pinch together the edges. The cooking time should be more or less the same, but keep an eye on it. As soon as it’s golden brown on top it’s done.

IMG_7705

Cheese and Kale Pide

Adapted from Nigella Lawson’s Feast

Makes 4 x 30cm / 6  x 20cm pide


Dough:

250g yoghurt

1 egg

25g butter, melted

300g flour

½ tsp salt

1 tsp baking soda


Kale topping:

A big glug of olive oil

1 bunch / packet kale, about 250g, finely sliced

3 fat garlic cloves, chopped

splash of soy sauce


Cheese filling:

150g mozzarella, preferably the more firm sort (because it’s easier to grate)

150g feta, crumbled

150g cream cheese

1 egg


For the dough, whisk together the yoghurt, butter and egg with a fork. In a large bowl, add 250g of your flour – keep the rest close at hand, because you’ll need it as you keep going. Stir in your yoghurt mixture. Stir stir stir, using a knife or spoon first, until it starts to combine and you can use your hands. Add more flour gradually until you have a soft but not sticky dough. Add the salt and the baking soda and knead that into the dough. I’m not quite sure why this happens at the end, but Nigella says to do so and we don’t question her. Next, cover the dough with clingwrap and let it rest for about 20 – 30 minutes.

Next, get a large frying pan and add the olive oil and kale. At this point I like to add a splash of water and cover it with a lid, and let it cook on medium heat until softened. Remove the lid and turn up the heat, adding the garlic. Once the kale’s volume has reduced to about 1/5 of what it was when it was freshly chopped, add the soy sauce and let that bubble away before removing it from the heat.

For the cheese filling, grate the mozzarella and combine it with the feta and the cream cheese. Stir in the egg. It’s not completely necessary to add the egg, however I find it helps keep the filling together.

Preheat the oven to 220°C. Divide the dough into 4 or 6 pieces. Roll one of those pieces into an oval shape of about 5mm thickness. Spread some of the cheese mixture along the centre and add some of the kale. Fold in the edges and pinch together the ends. Repeat with the rest of the ingredients.

Slide the pide onto a baking paper lined baking tray and bake for about 20 minutes, or until the edges are golden and the bottom is cooked when lifted up to test. Serve with sweet chilli sauce, a knife and a napkin.

Saffron and Kale Soup with Chipotle Buttered Toast

IMG_7554

Almost four weeks ago, I got on a plane with two very heavy suitcases, two packets of tissues and a heart full of excitement. After six absolutely wonderful  years in Australia, I returned to Switzerland, my other home. It’s great to be back. This time round it’s a little easier getting used to my “new” home, because everything is familiar. Yet there are so many subtle differences I’m having to accustom myself to, such as not adding a “how are you?” after the initial “hello” when speaking to a stranger, having to look up when waiting for a green light when crossing the street because it doesn’t make a clicking noise when it’s okay to go and remembering that most of the shops are definitely not open on Sundays. And at the same time I can’t help but miss the smell of eucalyptus, the friendly cats everywhere, the affordable restaurant food, the lovely friends left behind. Sigh.

Before I get all mopey and nostalgic, let me share with you a recipe I used to make about once a week back in the Melbourne era. It’s not really a recipe per se, more an assembly of ingredients, one I’d fall back onto when my five a day count was near non-existent, when I felt that I needed to give myself and my suffering immune system some pampering. It’s a simple vegetable soup, with the addition of saffron, for a little special hint of sunny warmth. You can add pulses, pasta and any herb you like, but I usually like to keep it simple and stick to the veggies in my fridge. The actual star of this dish is the chipotle butter, which I used to have on toast, now on fresh, crunchy, chewy bread (gasp!). It’s spicy and wonderful and very very morish, so be sure to make more than you think you’ll need.

To cold days, to winter, to warm hugs and memories.


Saffron and Kale Soup with Chipotle Buttered Toast

Serves 4


olive oil

1 large onion, finely chopped

2 garlic cloves, sliced thinly

2 tomatoes, sliced thinly

1/6 celeriac, finely chopped

2 carrots, quartered, finely chopped

3 medium potatoes, cut into small cubes

4-5 kale leaves, very thinly sliced

1.5 litres of vegetable stock

1 big pinch saffron threads

a dash of soy sauce

a few drops of lemon juice

salt, pepper

In a large saucepan, fry the onion in the oil until translucent. Add the garlic, stir for a minute or two, then add the tomatoes. Once the tomatoes are soft, add the rest of the vegetables, the stock and the saffron. Bring to the boil and simmer gently until all vegetables are cooked through. Brighten the soup with the lemon (you don’t need much) juice, add the soy sauce for a boost of umami, and season to taste. Serve with crusty bread or toast and chipotle butter (below).


Chipotle Butter

100g butter, softened

2 tsp chipotle chilli powder

salt

a tiny squeeze of lemon juice

In a bowl, beat the butter with a fork to loosen it up. Add one teaspoon of chipotle and a few pinches of salt, as well as the lemon. Give it a good stir. Have a taste, then add more or the rest of the chipotle. It will seem quite spicy at first, however it will soften as it rests.

If you really don’t like spicy, I suggest you only use ¼ tsp of chipotle and replace the rest with smoked paprika powder.

Beetroot Relish and Dilled Sour Cream Poppadom Bites

poppadoms and trimmings

Autumn is such a beautiful time of year. The mornings surprise you with their icy presence, the tips of the trees are starting to turn golden, and the fruit trees in the neighbours’ gardens are exploding with a bounty of ripe goods. Soup season has well and truly arrived. While the jumpers have begun to reconquer their place in the cupboard, our daily tea consumption has doubled. Root vegetables are waving to us warmly at the supermarket as we gently bundle them up and take them home to create a dish of filling comfort.

Growing up in Bern, soup was an ever-popular staple over the colder months. At my dad’s we had a recurring list of menus to which we’d fall back on, including my stepmum’s legendary Bircher Müesli, Gschweuti, which is basically boiled potatoes served with a selection of toppings, apple tart, and at the time my little sister’s favourite, Riz Casimir, rice served with tinned fruit and tofu in a mild curry sauce. Another favourite, but slightly more rare guest on our dinner table, was borscht. I loved the almost ceremonial way the sour cream was dolloped onto the steaming burgundy soup, how you had to give it a good scattering of chopped dill fronds before gently scooping it up with a spoon, all the while trying not to disturb the stunning contrast of the beautiful colours.

So there I was the other day, daydreaming about finger food (yet again), when I thought about how swell it would be if I took those earthy cold-weathery borscht components and jazzed them up into a suave little nibble. Bring on that beetroot.

These babies are best assembled shortly before entering your mouth, so I suggest you spread all the ingredients out on a table and let everyone construct their little poppadum parcels themselves.


Beetroot relish

adapted from notquitenigella 

1 medium sized beetroot

½ tsp black mustard seeds

2 Tbsp olive oil

1 small onion, finely chopped

¼ tsp ground cinnamon

1 allspice berry (dried)

pinch chili flakes

½ tsp salt

3/8 cups raw sugar

¼ cup apple cider vinegar


A few hours before you want to make this nibble, start with roasting the beetroot. Do this by preheating the oven to 180°C, wrapping the beet tightly in tin foil, and letting it roast for a few hours. It will be done when you can easily slide a knife into it. Remove from the oven and cool.

When ready to make the relish, peel and grate the beetroot on the large holed – side of a box grater and set aside. In a small saucepan, heat the mustard seeds until they begin to pop. Add the olive oil and onion, and cook until translucent. Add the rest of the ingredients and let them bubble away until almost all of the liquid has evaporated. Make sure you stir it occasionally so it doesn’t catch. Once it’s done, remove from the heat and transfer to a jar. Let it cool down before you serve it. Why? Because the poppadums soften a lot quicker with heat, and we don’t want that.

Any leftover relish will keep in your fridge for at least a week.


To serve

1 packet small poppadums

200 ml sour cream (use light, full-fat or even Greek yoghurt. Just none of that non-fat stuff.)

1 bunch dill, leaves picked and finely chopped


Pop the poppadums in the microwave ( 30 sec – 1 min on high). Stir up the sour cream and mix it with the dill. Get your relish out. Once you’re ready to assemble and immediately eat these cuties, grab a poppadum, top it with some relish and  some dill sour cream. Crunch. Repeat.

Vegetarian Harira with Date and Almond Couscous

harira

I feel like it’s high time I give you guys something sweet for you to sink your teeth into, but for some reason it’s the savouries that have captured me and taken me on a trip to enthusiasmville, and I must say I quite like it.

Up next is a soup I had forgotten about for more than two years, which is bordering on criminal because it truly is a beautiful soup. Harira is one of those exotically seductive yet immensely comforting soups, flashy enough to serve as a special dinner but also perfect for a midweek meal. To make up for the lack of lamb in this vego version, I’ve added a few chopped up dried porcini mushrooms. I’ve also replaced celery, not because I have split feelings about it, but because I think that parsley stalks have an incredibly complex flavour, which cooked along in the soup do a fabulous job at adding that dynamic that usually le celery is responsible for. The medley of spices work spiffingly with the vibrant tomatoey broth, and is made even better by the accompaniment of the sweet buttery almond-flecked couscous. The soup will taste better the next day, as most soups do. But even a few hours after you’ve cooked it will do if that’s all the time you’ve got.

And yes I have a thing for shooting food in tiny (blue) dishes. And no, that is not a serving size I would ever dare to serve someone, let alone myself.

Vegetarian Harira with Date and Almond Couscous

Serves 4

4 slices dried porcini mushroom, very finely shopped

3-4 Tbsp olive oil

1 large onion, finely chopped

1 carrot, finely chopped

3 cloves garlic, chopped

1 cinnamon quill

1 tsp each of ground turmeric, ginger, cumin and paprika

1 pinch saffron

the stalks of half a bunch of parsley, tied in a knot

1 large red capsicum, finely chopped

400g tin chopped tomatoes

800ml stock

1 can chickpeas, half of them crushed with a fork

splash of soy sauce, salt

¼ tsp chilli flakes

half a bunch parsley, leaves finely chopped

half a bunch coriander, leaves picked

Place the chopped porcini mushrooms in a small bowl and cover with boiling water. Set aside.

In a large pot, heat the olive oil and add the onion and carrot. Fry until softened. Add the garlic and the spices, and stir until fragrant. Add the soaked mushrooms with their liquid, the capsicum, parsley stalks, capsicum, chopped tomatoes and the stock, and bring to the boil. Let it cook until all of the vegetables are soft, about 20 minutes. Add the chickpeas and soy sauce and season to taste with the salt and chilli flakes. When ready to serve, ladle into bowls and top with the parsley and coriander. Serve with the couscous (below).

almond and date couscous

Almond and Date Couscous

Serves 4

1 big nob of butter

1 fat garlic clove, finely chopped

1 cup / 190g couscous

1/2 tsp cinnamon, plus more to serve

1 cup /250ml boiling vegetable stock

10 dates, chopped into tiny cubes

1/3 cup /40g slivered almonds, toasted

In a small pan, melt the butter and add the garlic. Once it starts to go golden, remove from the heat and stir in the couscous and cinnamon. Pour over the boiling veggie stock and cover for about 5 minutes until completely absorbed. Fluff with a fork and stir through the chopped dates. Divide the couscous amongst serving dishes and top with the toasted almonds.

Creamy Zucchini Linguine

creamy zucchini linguine

It’s time for some more pasta I think. Melbourne, in its cheeky European-esque manner, has decided to have a good cry on all the plants and a few bits of stray washing outside today. It’s a good day for staying inside, drinking tea and making lists.

Pasta is rarely something I cook for guests, because I think they deserve more of an effort than that. But as a homey dinner for one, this is spot on. There’s something so inherently comforting about a bowl of pasta that for once isn’t laced with pesto or marinara, something cheesy and decadent but with still enough of a vegetable percentage for you to hi-five your conscience for getting at least one fifth of your five a day.

The combination of zucchini, garlic, thyme and dairy is one you’ve come across before here. If you by some chance are in possession of too many zucchinis, make both recipes.


Creamy Zucchini Linguine

Serves 4, with salad or something else to accompany it – can be halved or quartered to suit your needs


400g linguine, or whatever pasta you favour

3 Tbsp olive oil

4 small firm zucchini, diced into 1 cm cubes

1 tsp fresh thyme, leaves picked, chopped

2 fat garlic cloves, finely chopped

250ml cream

1 splash soy sauce, because umami, obviously

salt to taste

90g / 1 cup freshly grated parmesan

chilli flakes


Bring a big pot of water to boil and add enough salt to make it taste like the sea. Add your linguine and cook for as long as the packet instructions say, stirring occasionally to prevent the pasta from sticking.

In the meantime, make the sauce. Heat the olive oil in a large fry pan and add the zucchini and the thyme. Fry the cubes over high heat until golden and cooked but still holding their shape. Add the garlic and  stir for another minute, before adding the cream, soy sauce, salt and ¾ of the parmesan. Set aside.

Pour your pasta into a colander, give it a good shake, and then add it to the sauce in the fry pan. Give everything a  stir and divide amongst four plates. Top with the rest of the parmesan and a few chili flakes.


PS: Feel free to add a whole 500g packet of pasta here. I just like a higher sauce to pasta ratio.

Quinoa Tabbouli with Feta, Almonds and Dates

tabbouli

“Another salad with feta eh? That’s so imaginative of you”. Ja, that’s me! If you knew how rarely I actually sat down and ate a proper salad, you’d be throwing feta at me by the bucketful ok? If I’m going to have a salad that’s worth my while, it’s got to be substantial, and if it’s that, it’ll probably need a few yum-factors in there to make me actually want to finish it. Who eats a whole bowl of quinoa on its own anyway. Nobody that calls themselves my friend, that’s for sure.

All that aside, this salad is well and truly a pretty damn tasty one, even if you omit the feta (don’t). Tabbouli has always been in my life in some way or another, in the form of a packet mix, as a component of my salad bar lunch, or that one time we had an unforgettable meal at this incredibly authentic and charming restaurant in the heart of a million little windy streets in Cairo.

In my hope to make it  more of a main meal type thing, sturdy enough to be packed away as a work lunch, and happy enough to sit in the fridge for a few days without getting grumpy at me or losing its flavour, I created this little thing. I’ve gone out and jazzed up the grain component with our trusty quinoa, added some cinnamon to the mix and roasted the cherry tomatoes to increase its fridge life. Throw in some almonds for crunch, some dates for added sweetness, and some feta for that hit of salty tang, and you are in for one sexy date with your lunchbox.

Tabbouli with Feta, Almonds and Dates

Serves 4


1 cup / 170g quinoa

2 cups / 500ml vegetable stock

1 tsp cinnamon

400g cherry tomatoes, halved

2 big bunches parsley, finely chopped

1 bunch mint, finely chopped

4 spring onions, finely chopped

2 lemons, juice

1/4 cup / 60ml olive oil

salt

100g Danish feta, crumbled

8 dates, finely chopped

1/2 cup / 60g slivered almonds, toasted


First, combine the quinoa, stock and cinnamon in a small saucepan. Cook it on a small flame, covered, until it’s done. Remove from the heat and cool completely.

Meanwhile, preheat the oven to 180°C. Line a baking sheet with baking paper and lay out the halved cherry tomatoes on it. Sprinkle them with a little salt and let them relax in the oven for about 20 minutes or until they start going wrinkly and have reduced in size. Remove and let cool.

In a large bowl combine the chopped parsley, mint, spring onion and quinoa. Add the lemon juice, olive oil and as much salt as you think is necessary.

When you’re ready to serve, scoop out a nice amount onto a plate and top with some of the cherry tomatoes, some crumbled feta, the chopped dates, and a sprinkling of the toasted almonds.


The salad will keep well in the fridge for at least 3 days. To ensure complete satisfaction every time you eat it, keep all the components separate in the fridge.

Cheesy Garlicky Flatbread

cheesy garlicky flatbread

You know what’s better than garlic bread? Nothing obviously, I hear you say. You’re wrong my friend. You know all those times you ordered garlic bread to accompany your sinfully satisfying take-away pizza, and almost without a doubt, the first bite into that scalding puff of steamy bread, your inner garlic demon chucks his garlic trident into a corner and turns his back to you. Because all you really have there is (not enough, never enough) molten margarine that was placed in the vicinity of a picture of garlic. WHERE IS THE GARLIC DUDE. But you eat it anyway, because you’re a respectful human being.

Homemade garlic bread is a whole other thing. But then so is cheesy garlicky flatbread. The topping on this beauty makes up for the (never enough) butter that ceases to exist as soon as your crusty garlic baguette is hot enough to remove from the oven. This garlicky cheesy flatbread has cheese and sour cream to accompany that deliciously enticing bite of (the absolute perfect amount of) garlic. And there’s some spring onion for added prettiness.

This is one of the best most possible things you can serve your friends while you figure out what next to turn into food before you pass out from hunger. Its tasty carby goodness hits that spot with a triple hi-five.

You might as well do it this Friday.


Cheesy Garlicky Flatbread

This is more an instructions list of how to assemble. Feel free to tweak to satisfy your needs.

As many rounds of flatbread (25-30 cm in diameter) as you think will be needed (2 or more for a group of 4 as an entree)

Per flatbread you will need:

3 heaped Tbsp sour cream (full-fat please)

1/2 tsp vegetable stock granules

2 garlic cloves, finely chopped

1/3 cup / 60g grated cheddar cheese, or anything that melts well and isn’t too strong in flavour

1 spring onion, finely sliced


Preheat your oven to 220°C. Spread the sour cream evenly over the flatbread. Be sure to be generous, as some of it will be soaked up by the bread as it bakes, but, not too much, or else it’ll slide right off when you go to pick up a slice. Sprinkle the stock granules evenly over the top. You can use whatever type of salty component you like, just make sure you adjust accordingly. Sprinkle the garlic evenly over that, followed by the cheese, and then the spring onion. Transfer to a baking tray and bake for 0-15 minutes or until the cheese has melted and the edges are taking on colour. Remove from the oven and cut into pieces. Share with friends.

Zucchini and Onion Fritters

zucchini and onion fritters

Yay it’s fritter time! One of my very favourite form of food is finger food. It’s so easy and casual while still being completely alluring – a little nibble here, a crumb there, maybe even with a drizzle of this, or a scoop of that. There are few things more satisfying than sharing a few plates of delightful nibblies with your favourite humans, I think we can agree on that.

This is such an easy little number to whip up. If you have onions, zucchini and chickpea flour, you’re most of the way there. The rest is just improvisation and decoration.

Serve them with both a sweet chutney and a tangy yoghurt sauce for a bit of fun and contrast.

While you’re at it, you might as well make some samosas to accompany them, or maybe even some herby spinach and cheese triangles.


Zucchini and Onion Fritters

Inspired by The Tiffin Box


2 large firm zucchini (700g)

1 tsp salt, plus more to taste

1 large red onion, quartered, then finely sliced

½ bunch coriander, leaves picked and reserved for the yoghurt, stems finely chopped

1 tsp ground coriander

1 tsp ground cumin

1 tsp whole cumin seeds

½ tsp turmeric

freshly ground black pepper

½ tsp baking powder

1 ½ cups chickpea flour

½ cup water

oil for deep/shallow frying


Coriander Yoghurt

250ml plain Greek yoghurt

2 Tbsp lemon juice

2 Tbsp water

1 small garlic clove, finely chopped

the leftover leaves from the coriander from above, finely chopped

1/3 tsp salt


Date chutney, to serve


Grate the zucchini on the big holes of a grater. Transfer to a colander, and sprinkle over the salt. Give everything a good squish, then let it sit for 15 minutes or so. You can either wait longer or not at all – the point is, we want to get as much liquid out of the zucchini as possible. Get back to your colander and smoosh the zucchini around, trying to squeeze all that liquid out. When you find there is simply no more liquid left, and you have zucchini shreds of about half the volume you did before, dump them into a large bowl. Add the onion, coriander stems, spices, baking powder, chickpea flour and water, and give it a good stir. Give it a little taste, because it might need more seasoning. If so, add extra salt. The mixture shouldn’t be too wet – it should just hold together nicely.

Preheat your oven to 150°C. While you’re frying your fritters, you can keep the already fried ones warm in the oven, so when you serve them, they’ll all be the same temperature.

Heat the oil in a large frying pan and drop in little spoonfuls of mixture. Once they’re golden on one side, flip them over and finish the other side. Let the cooked fritters rest on a bed of kitchen paper while you continue with the rest of the mixture.

For the yoghurt, combine all ingredients in a bowl. Serve with the fritters and the date chutney.