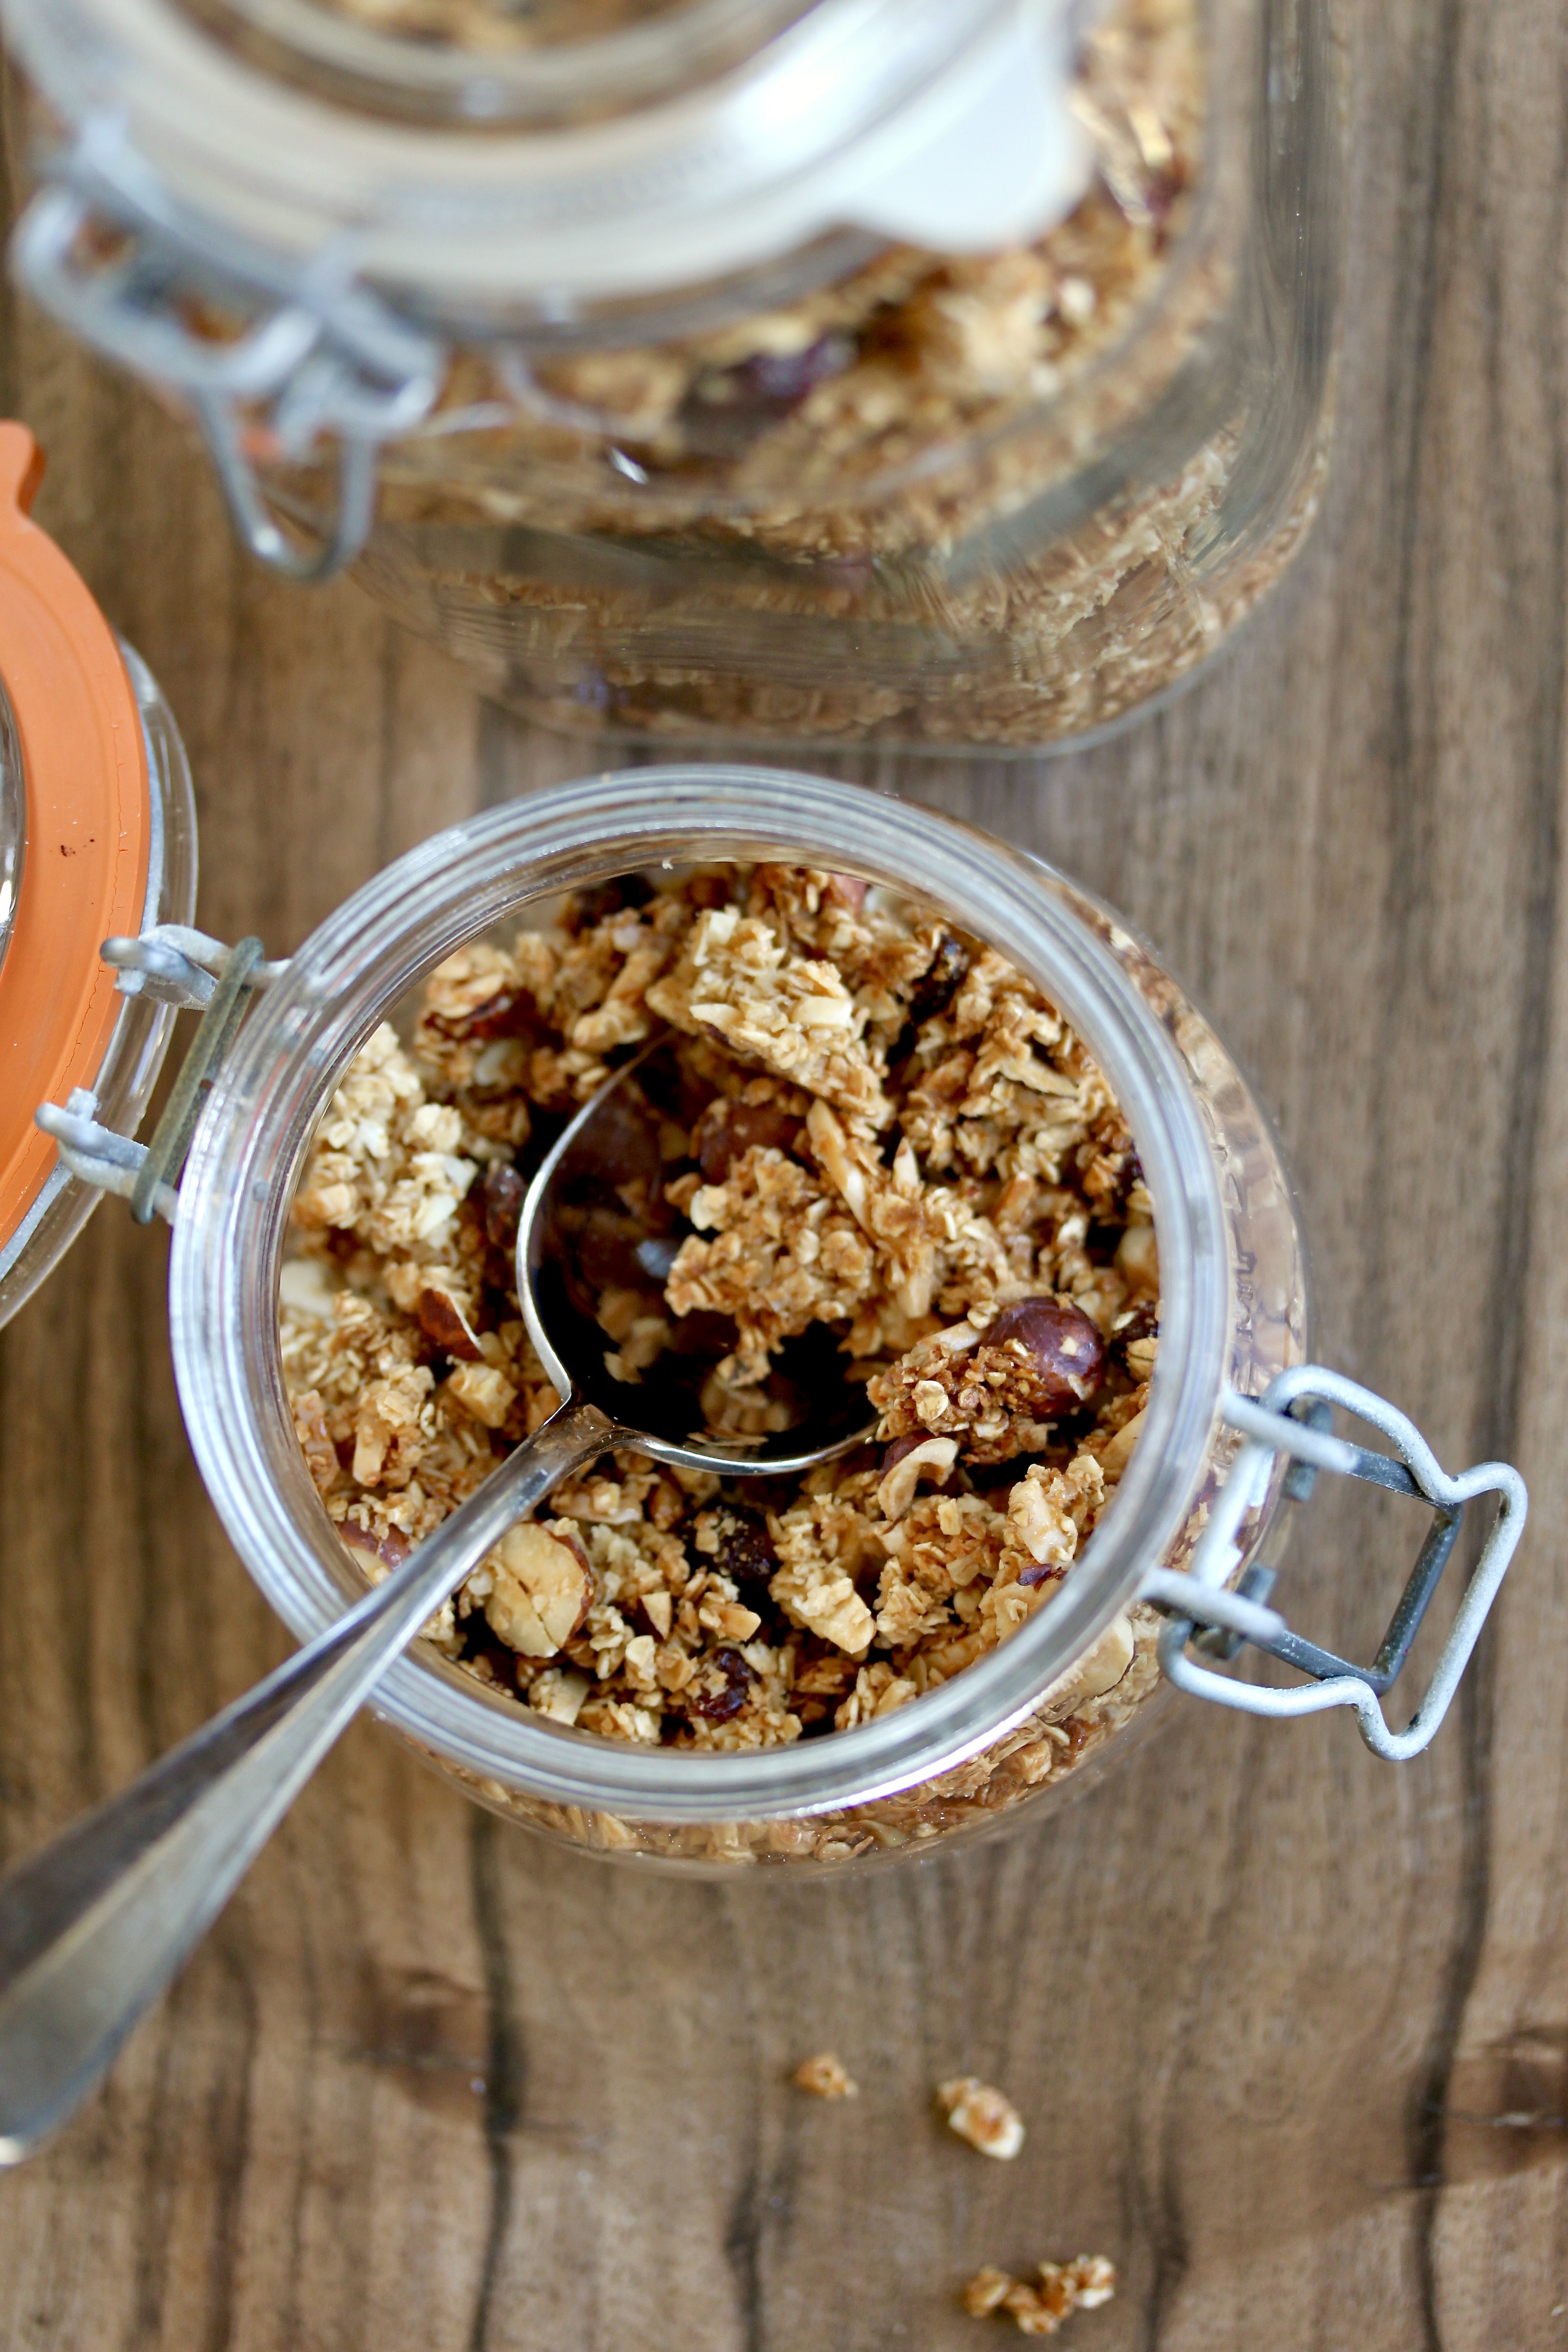
This is the granola recipe of all granola recipes, swearsies realsies. It has beautiful crunchy clusters. It has the perfect selection and ratio of nuts and dried fruit to oats. It has a lovely maple-y depth. And, maybe most importantly, it is also seed-free. Good, satisfying granola should by no means be health food. If you want healthy, go and have some raw oats with fruit. This is not that. However, this granola is immensely satisfying, in a pat-on-the-back, treat-yourself sort of way, which is exactly where I want a granola to be.
This granola clumps beautifully, which is largely due to the addition of honey, which, with its ultra-high concentration of sugars to water, acts as a glue. This cannot be achieved with maple syrup alone (I’ve tried). Not stirring the granola during the baking process helps in the chonky clump-formation, too.
I like to add my cranberries right at the beginning, as opposed to at the end, as I enjoy a cranberry with a nice chew to it. If you are someone who prefers them on the softer side, add them at the 15-minute mark.
1 Tbsp relatively neutral vegetable oil – I have a small bottle of walnut oil kicking around that I like to use for this
125 ml maple syrup
2 Tbsp honey – if not runny, warm in a small pan before adding to mix
1 tsp vanilla essence
300g porridge oats
150g roughly chopped hazelnuts
100g slivered almonds
100g dried cranberries, roughly chopped
50g desiccated coconut
A good pinch of salt
Preheat your oven to 150°C and line two baking trays with baking paper. Mix the oil, maple syrup, honey, and vanilla in a large bowl.
Add all the remaining ingredients and mix well. Scoop onto the two baking sheets and spread out evenly. Bake for 25-30 minutes without stirring, checking at the 15-minute mark to see how things are doing. Once golden brown, remove from the oven and cool.
Now, because you haven’t stirred the mixture, you will be blessed with giant shards of granola. It is now up to you how large or how small you’d like the pieces to be – so transfer or crumble them into one 2L and one 1L glass jar. Enjoy however you like.
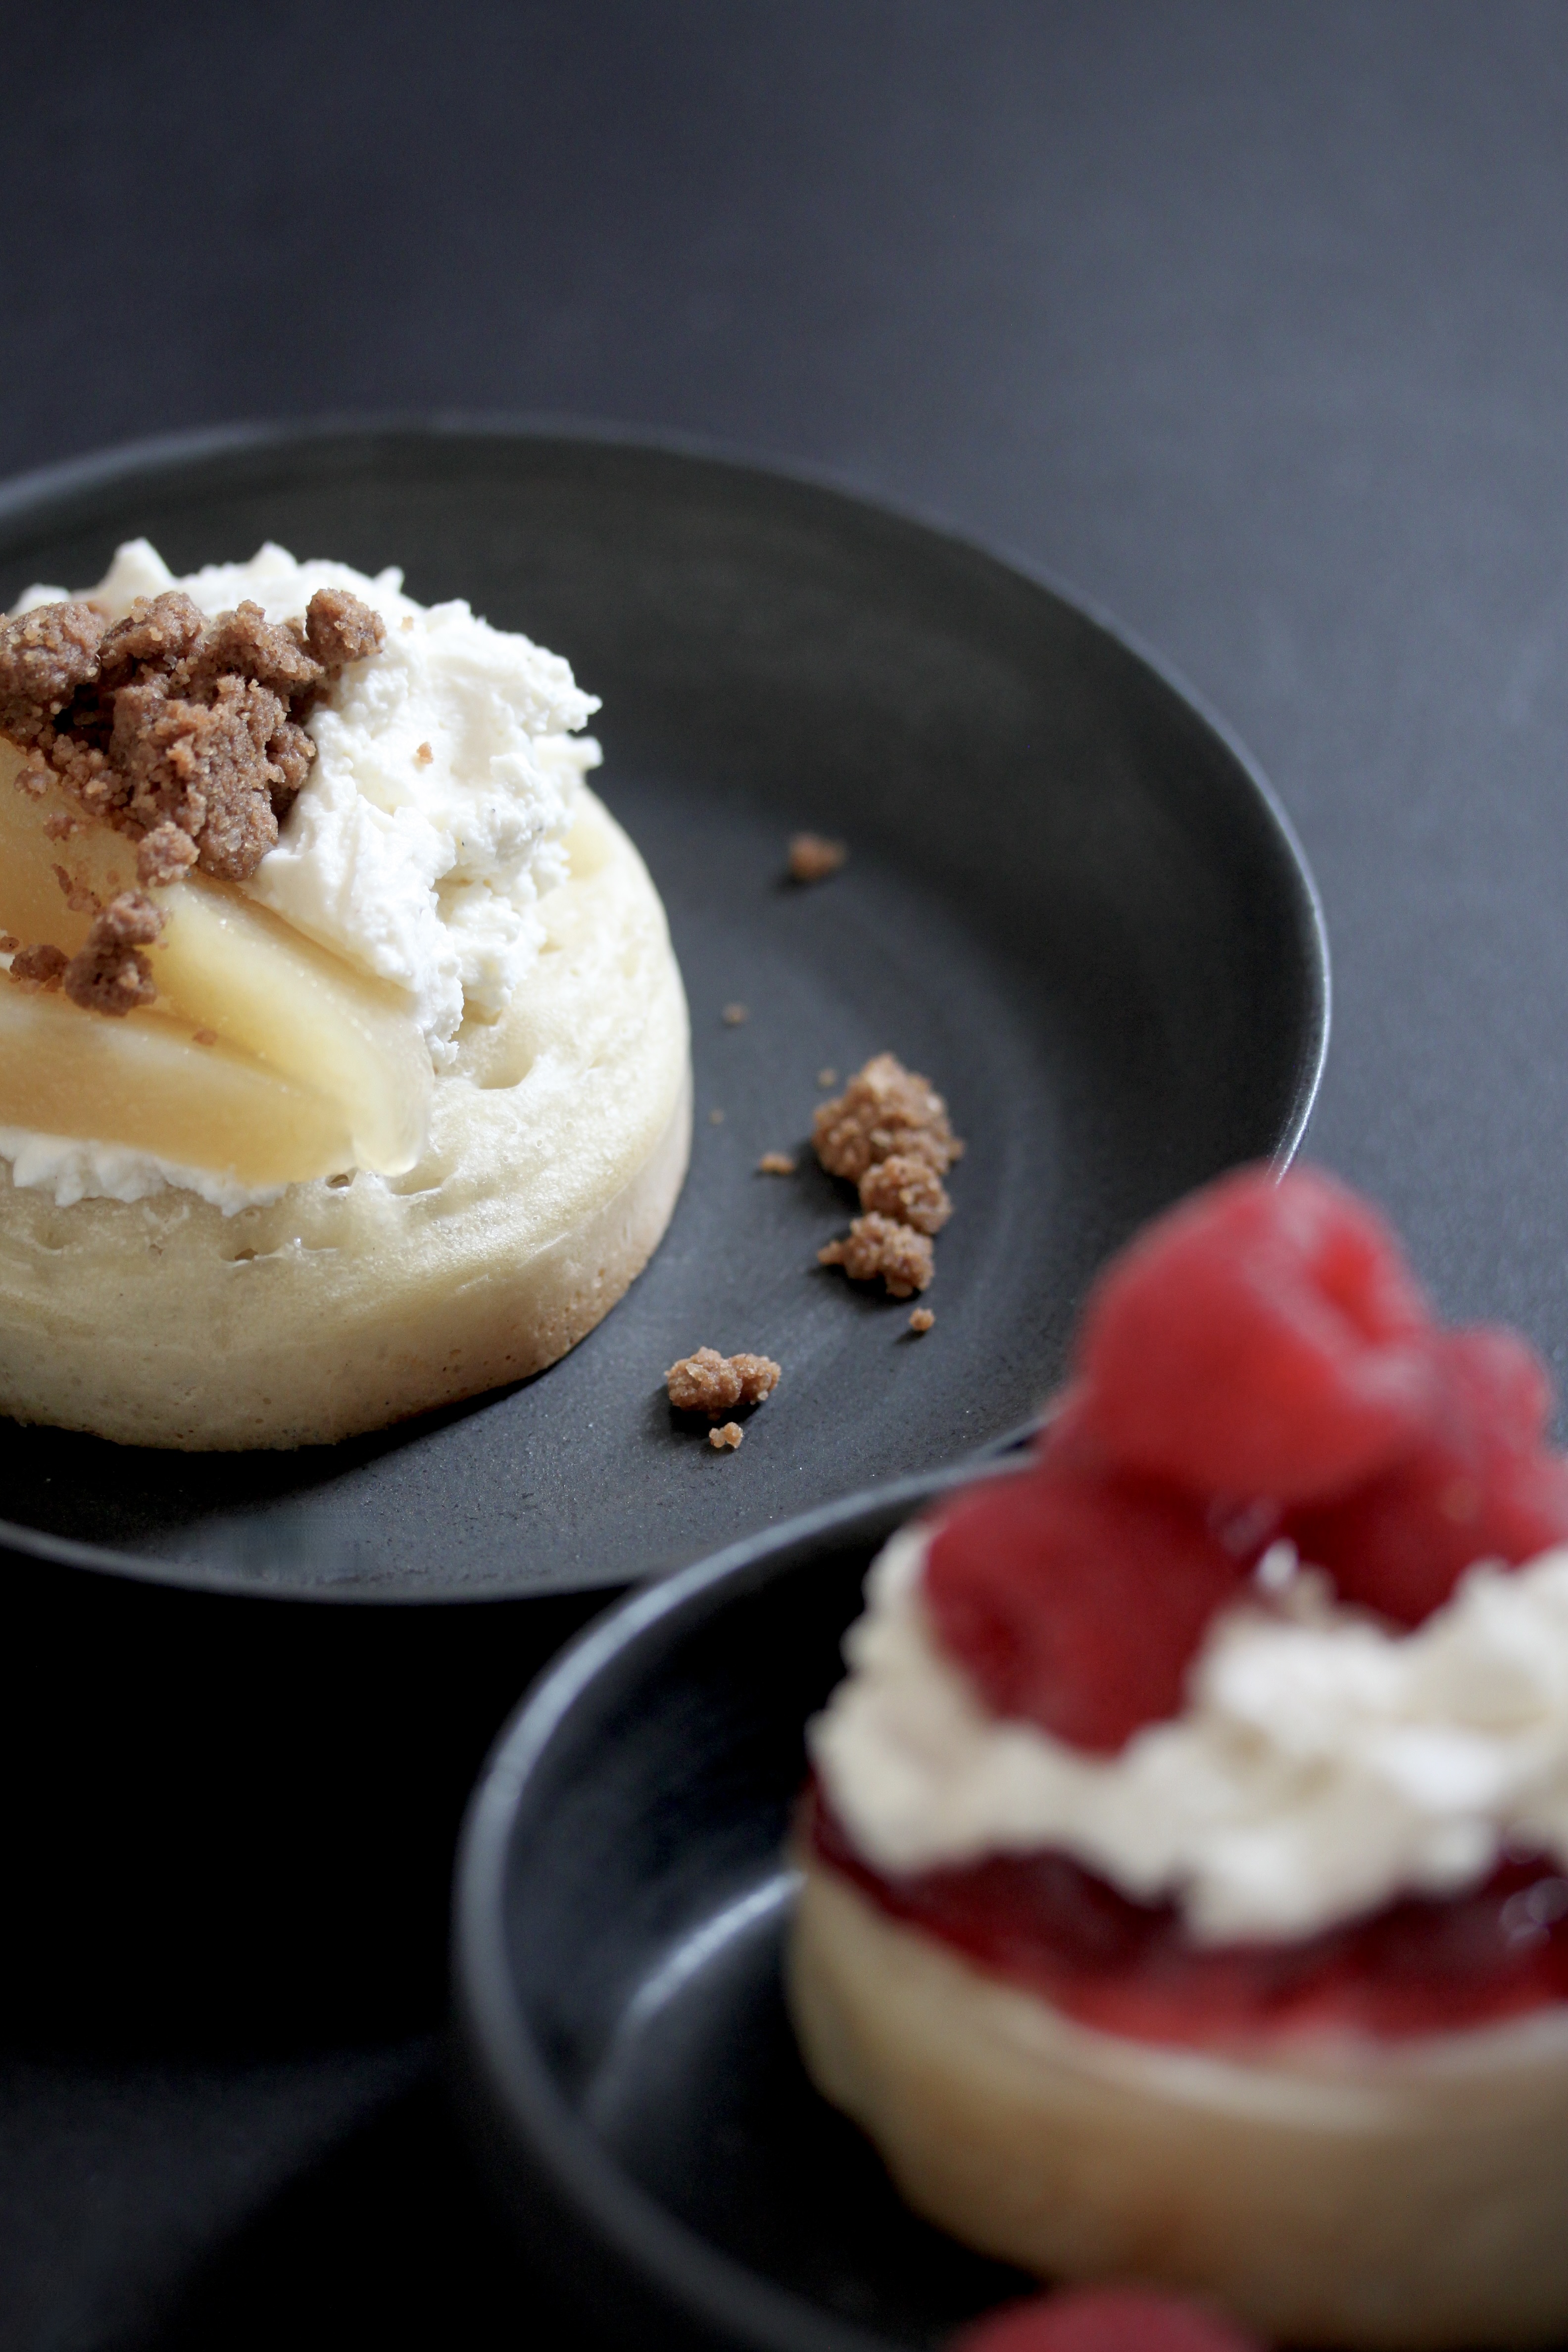
Wherever you may be at this moment in life, if you haven’t had a homemade crumpet yet, then you need to take stock of the flour in your pantry and reassess your weekend breakfast plans now. These are not the same as store-bought crumpets – although they too deserve a special place on the breakfast plate. Homemade crumpets are what I like to call “the better pancake” – they are slightly on the sturdier side, which prevents them from deflating and disintegrating into a mushy heap on your plate. They are fluffy and moist and covered in little holes into which you can pour maple syrup as it combines with the slowly melting pat of butter snuggled on top. They are humanity’s gift to breakfast for when you’re feeling fancy and lazy at the same time.
Crumpets
Makes 15 (7.5cm in diameter) crumpets
This is double the amount listed on the Warburton’s website, but if you’re going all the way to make them, you may as well make enough to last you a few breakfasts. They keep in the fridge up to 3-4 days.
You can easily make these using round cookie cutters (yes, they can all be different in size) or indeed crumpet rings, but if you don’t, but think this is something you you may make on the regular, I suggest you get yourself a four pack of non-stick egg rings with a little handle – it makes handling the crumpet so much easier (and burn-free). Make sure you get ones with an edge about 2cm high – this will determine the height of your crumpet.
300g flour
400ml water, plus two Tbsp extra for the yeast
1 tsp salt
2 tsp dried yeast
2 tsp baking powder
1 tsp sugar
vegetable oil and a pastry brush
Combine flour, water, and salt in a big bowl. Get out your electric whisk and whisk until everything is smooth and completely combined.
In a small bowl, combine the two extra tablespoons and the dried yeast until more or less dissolved. If you’re considering skipping this step and just dump everything into the big bowl, don’t – I have, and the yeast ends up forming little clumps which are a pain in the neck to try and dissolve in the batter. Add to the big bowl, together with the baking powder and sugar and give it a good whisk with your mixer again until everything is completely combined – the consistency should be close to that of a smoothie.
Cover the bowl with a moist tea towel and let it sit in a warm place for 15 minutes. The dough will rise slightly, and the surface will be covered with little bubbles.
Once you’re ready to make the crumpets, heat a frying pan big enough to hold your four cookie/crumpet/egg rings over medium heat until the rings are hot to touch. Dip your brush into the vegetable oil and oil around the inside of the rings. Scoop a ladle of batter into each ring, coming up ¾ of the sides of the rings – any higher and they will overflow. Now, you wait as the bubbly batter starts to cook, forming a fluffy interior and a crisp exterior. This is not a moment to rush things, okay? Once the crumpets have started coming away from the sides of the rings, golden on the bottom and nearly done on top, you can go ahead and flip them. They may need a little extra help with a knife if they’re sticking to the sides. Let them sit for a minute longer, than remove and set onto a plate or wire rack to cool while you repeat the same process with the rest of the batter.
You can either eat them immediately (might want to give them a quick dash in the toaster if they’ve cooled off a little too much) or let them cool down and stash them in the fridge in a zip lock bag. They can easily be reheated in the toaster for two to three minutes.
To eat, top them with whatever you would top toast or pancakes. I love them with a nice glug of maple syrup, some unsalted butter (salted butter is more expensive in Switzerland – I know, the audacity) and a sprinkling of flaky sea salt, but you do you.
If you really feel like doing you, even perhaps hosting a crumpet breakfast party, then please, scroll down – I have many pieces of sage advice to give to you.
How to “Crumpet BrunchSpread“
You can do this as casual or as glam as you want, but I’m only going to give you the glam version because life is too short to not be glam.
You want to have a mixture of sweet and savoury components, so you and / or your lovely guests can come up with their own combinations without having to feel like their sweet tooth / savoury denticle is neglected. I suggest providing a collection of creamy “primers”, which provide a base upon which you can arrange the rest of the toppings:
primers
butter
soft cheeses, e.g.,
whipped mascarpone with a scraping of vanilla seeds (for the sweet toppings)
cream cheese or labneh (excellent for both sweet and savoury toppings)
NOT ricotta. Ricotta is dry and bland, and while this is definitely a good thing in other contexts, it isn’t here. Begone, ricotta.
Then, you want your fruit and vegetable toppings. Consider going for the same or similar level textural softness as the crumpet for these, as they will otherwise tumble off your crumpet into a sad crumpet-less salad on your plate if they aren’t. If they are already naturally soft (e.g., mango slices or avocado), go forth and use them as they are. If they are a little firmer in texture (e.g., cherry tomatoes or pears), I suggest roasting or poaching them.
fruit
poached pears (one pear, cored and cut into slices, poached in 150ml water, 2 Tbsp sugar, 2 Tbsp lemon juice, and two cloves for 10-30 minutes depending on pear until soft and translucent)
mango
fresh berries
veggies
roasted cherry tomatoes (drizzled with olive oil and seasoned with salt and pepper, roasted in a 180°C oven for 20 minutes until blistered and soft)
sliced avocado
caramelised onions
Here, you might want to add a condiment or two to add a little seasoning and flavour to your medley:
sweet condiments
jam
honey
maple syrup
savoury condiments
flaky salt
freshly ground pepper
finely grated parmesan
truffle oil
harissa
Finally, to take this from brunch to fancy brunch, you need to add some crunch (ha!):
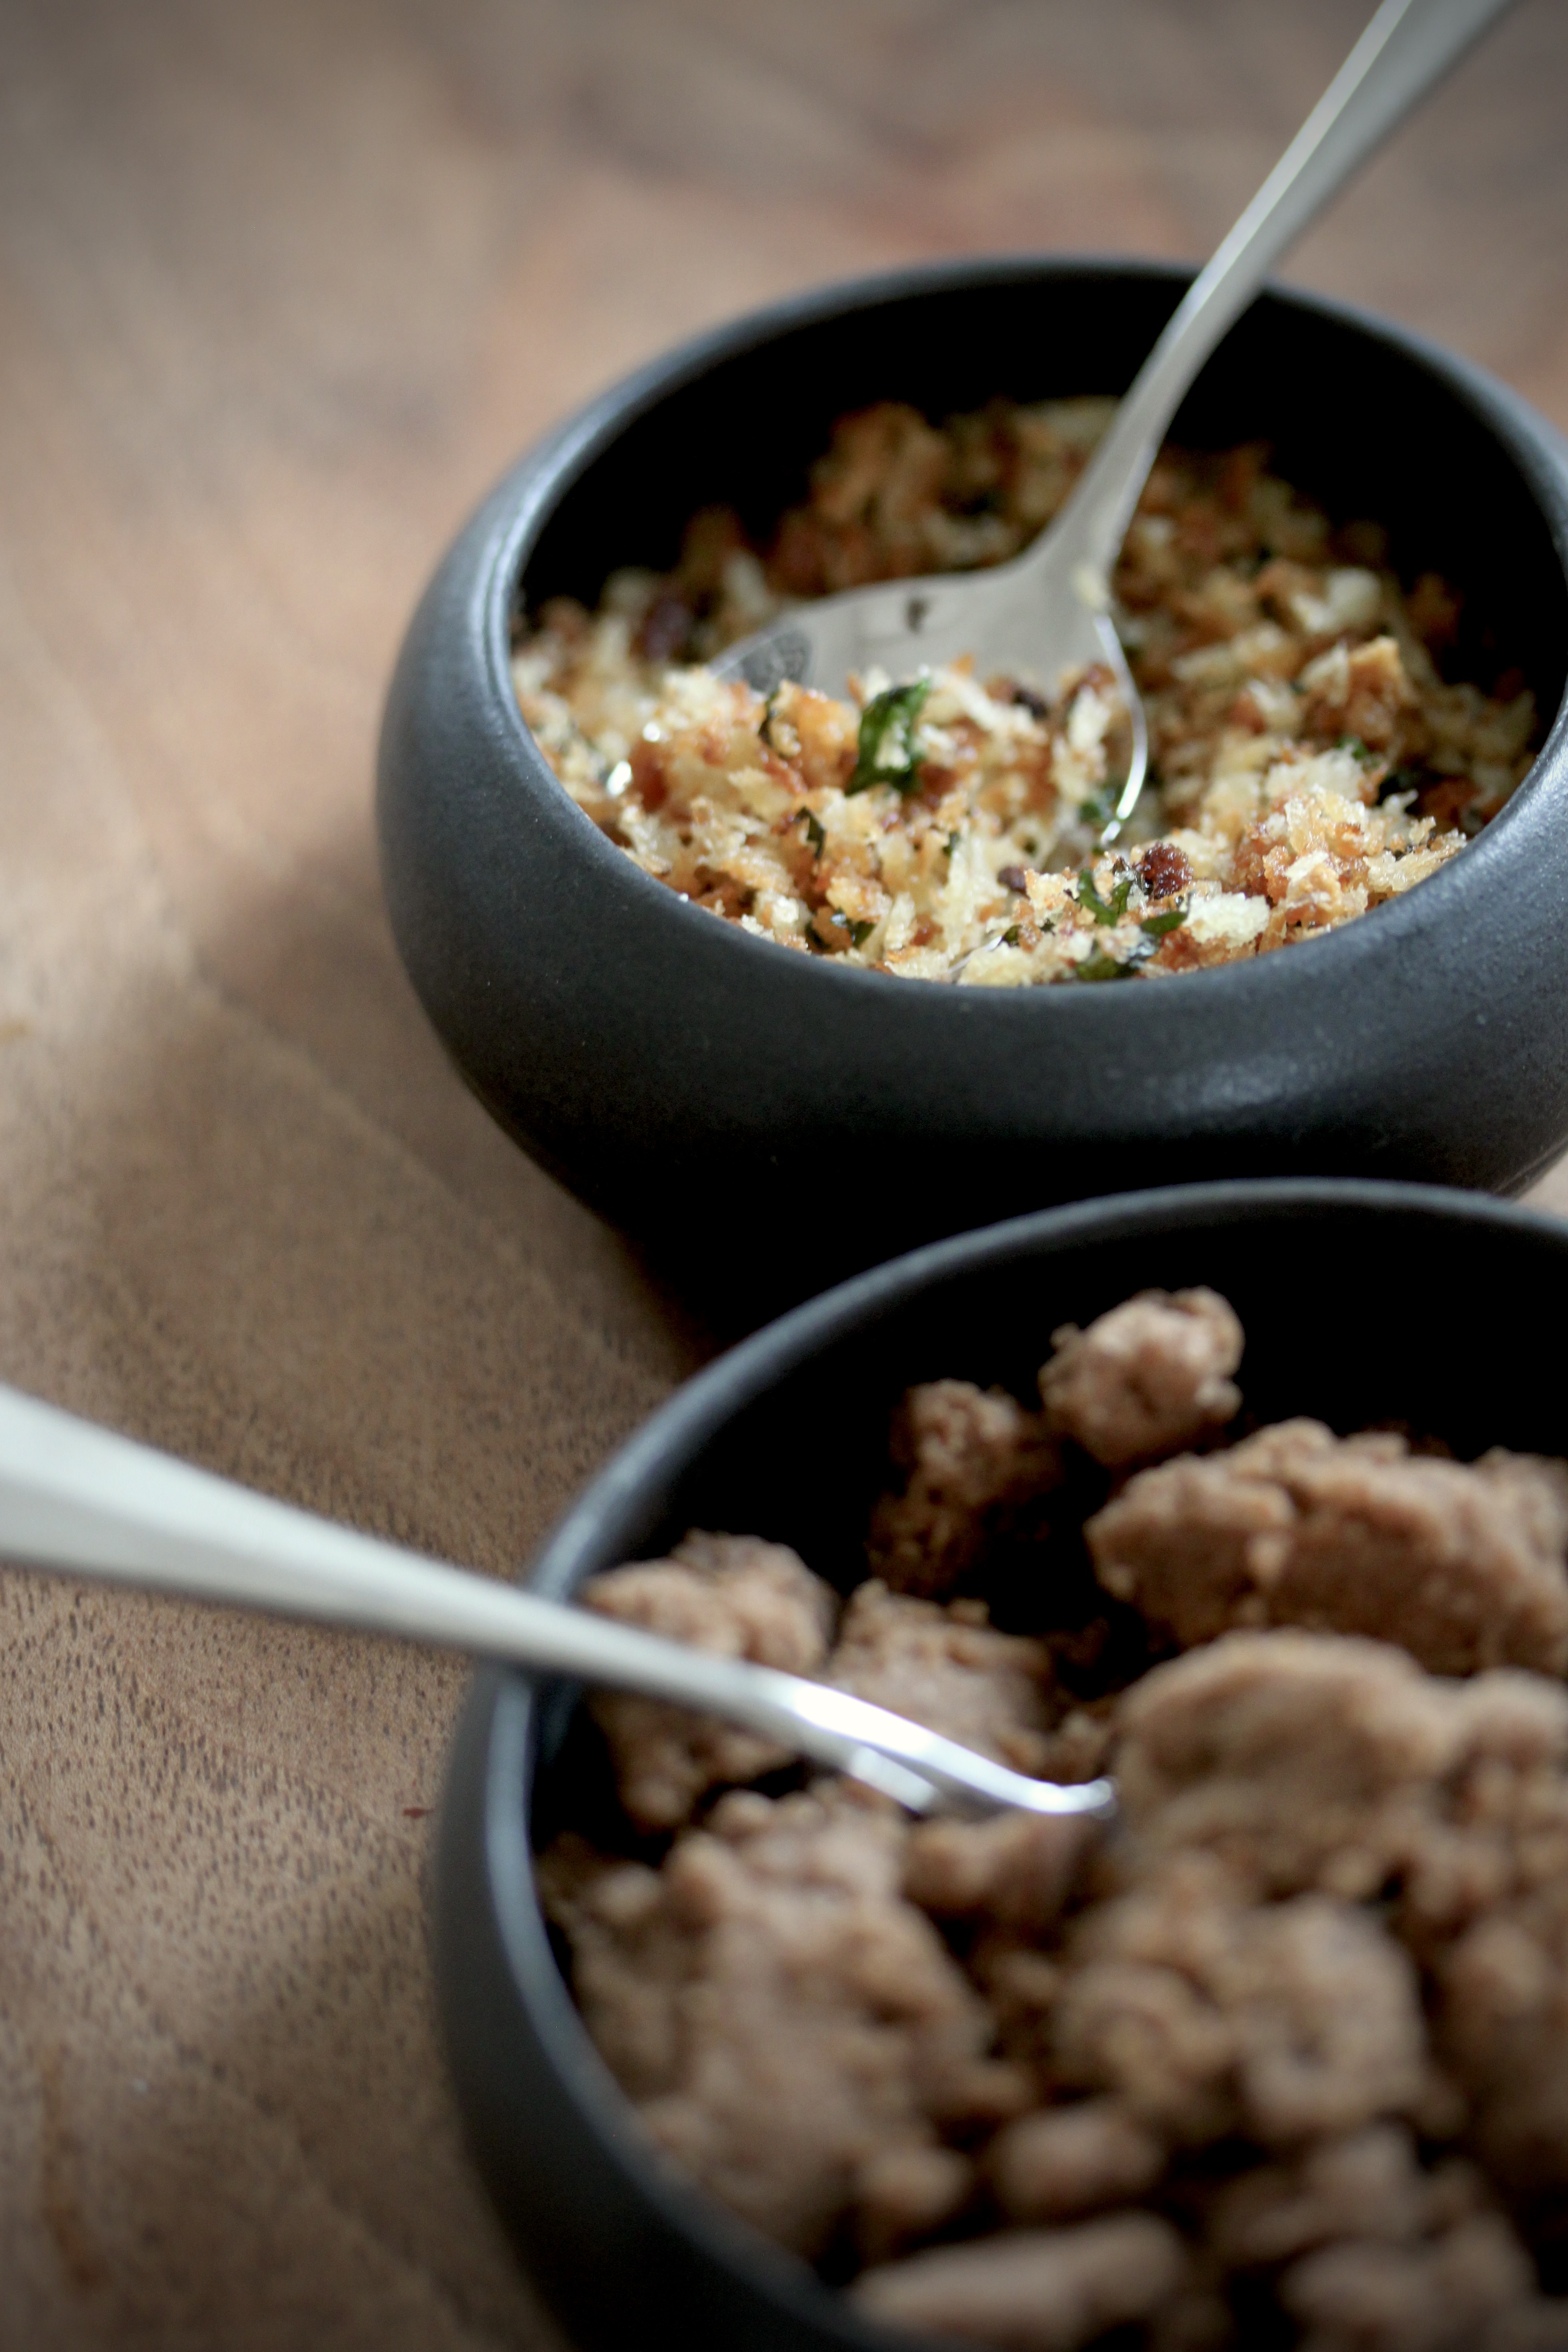
sweet crunch
cinnamon streusel (50g flour, 50g sugar, 40g cold butter, 1 tsp cinnamon, and a pinch of salt – mix with your fingers into a crumbly dough, making sure to clump a few bits together. Remember, you are the master of how chunky or sandy your crumble is. Bake for 20 minutes in a 180°C oven – it will have darkened a shade or two. Remove from oven and cool)
savoury crunch
garlic pangrattato (Combine two pressed garlic cloves and one tablespoon finely chopped parsley in a frying pan with two tablespoons of olive oil. Fry until the garlic begins to turn golden, then add 5 tablespoons of panko. Season with salt. Keep stirring until a lovely golden colour. Remove from heat and cool).
This has been our favourite soup for the past year and has been on medium to high rotation on our dinner table. It is tangy and luscious and utterly packed with umami.It. Is. Absolutely. Incredible. It may not be authentic or traditional, but in a world of continuous adaptation and improvisation, what really is. It’s what we like and what makes us happy that counts, and in this current situation of impending doom, that is truly what we need right now.
I’ve adapted the original Bon Appétit recipe to better suit the contents of my fridge and possibly yours, too. All toppings are optional, but I’d suggest you definitely add something green and something protein-y to make this more of a meal.
3 spring onions, finely sliced – reserve about ¼ for garnish, preferably the green bits
1-2 Tbsp oil of your choice – I like to use the oil from the chilli garlic crisp if I have it on hand
2 slightly heaped Tbsp tomato paste
1 slightly heaped Tbsp light miso paste
1 litre vegetable stock, plus 250-500ml water to thin out at the end
8 dried (whole) shiitake mushrooms
2-3 Tbsp soy sauce or to taste
50g butter, cut into rough pieces – the butter is essential, so don’t skimp on it
250g dried ramen or other long noodles (I’ve even used fettuccini here – I don’t know about you but I am too lazy to head into town just to get the right type of noodle)
Add the ginger and ¾ of the spring onions and the oil to a large pot and fry over high heat for a few minutes, stirring often, until they begin to take on a bit of colour. Add the tomato paste and stir for another minute. It will begin to stick to the bottom of the pan and darken slightly. Add the miso and give it another stir before adding the litre of veggie stock and the whole shiitake mushrooms. Cover and bring to a boil, letting it simmer for about 15-20 minutes, or until the mushrooms have softened enough to be easily pierced with a sharp knife. Remove from the heat and give it a good blend with a handheld blender. It is at this point where you might want to add a bit of extra water – I like it to be the consistency of thin cream, but you might feel a little different. Just keep adding 100ml at a time until it reaches your desired consistency. Add the soy sauce to taste, and finally, with the blender on, add the butter bit by bit until it is completely emulsified. Give it another taste to check for seasoning, find someone in your vicinity to lock eyes with and whisper “Oh my god”, followed by a passionate “Mmmmmhmmmmh!!”, and keep it warm, covered, while you prepare the remaining ingredients.
Cook the eggs to your liking. Peel and halve. Cook the noodles according to the packet instructions. Add the kale to a pot with a little salted water and cover. Let it steam for a few minutes until just soft. Add the tofu to the pot and set to the side, covered – this will ensure it will be nice and warm when you serve it.
To serve, ladle the soup into bowls and divide the noodles, eggs, kale and tofu among them. Top with the spring onion and a sprinkling of sesame and serve with the chilli and garlic crisp on the side.
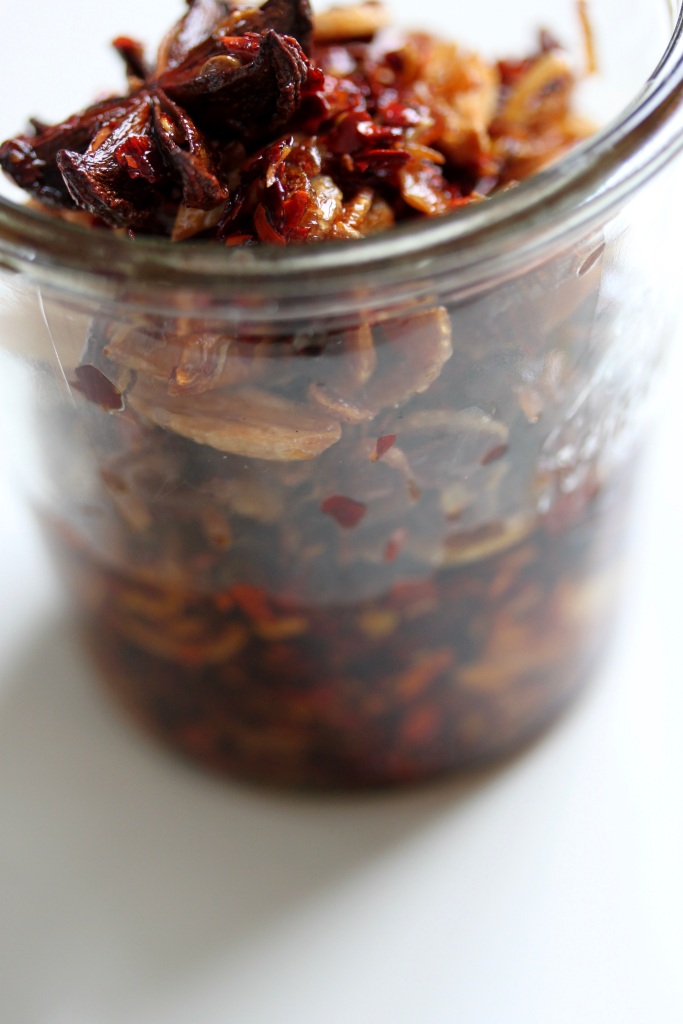
I’ve made this a million times and each time it’s a little different, depending on how garlic heavy I’m feeling that day (usually very). It doesn’t tend to last very long at ours, as one of us can usually be found picking out a crisp slice of garlic to gluttonously chomp on on our way past. Yes, we are monsters. I like to make this to accompany a bowl of ramen, but really, this will work with anything. The original recipe calls for soy sauce instead of vegemite, however, I’ve found that the water in the soy sauce will make the garlic lose its crispness a lot faster. If you hate vegemite, by all means replace it by 1-2 Tbsp of soy sauce. The goal is for it to have a slightly funky salty bite, along with the heat and the crispy textures.
Combine the oil, cinnamon, star anise, garlic and shallot in a small pan over low to medium heat and let it bubble gently. You don’t want it to cook too quickly, otherwise the garlic will start browning at the edges while the centre is still soft, and that’s not what we want – we want evenly crisped golden garlic, so keep your eye on it.
In a bowl, combine the chilli flakes, the vegemite and the honey. It will be a little clumpy, but that’s okay.
Once the garlic just begins to take on a golden hue – this can take any time between 10-20 minutes, add the ginger. Continue frying on a low heat until everything is a nice golden hue but isn’t starting to brown – the garlic will get bitter if it does. Remove from the heat and carefully pour the hot oil over the chilli, making sure to keep back the garlic and shallot in the saucepan – not combining everything at once gives the garlic and shallot the time crisp up. Give the chilli flake and oil mixture a good stir and let it rest for about 10 minutes. Once it has cooled down, stir in the now very crispy garlic and shallot. Transfer to a glass jar and use at your own discretion.
This will stay crisp for about a week, but will still be good a few weeks after that, albeit not as crispy.
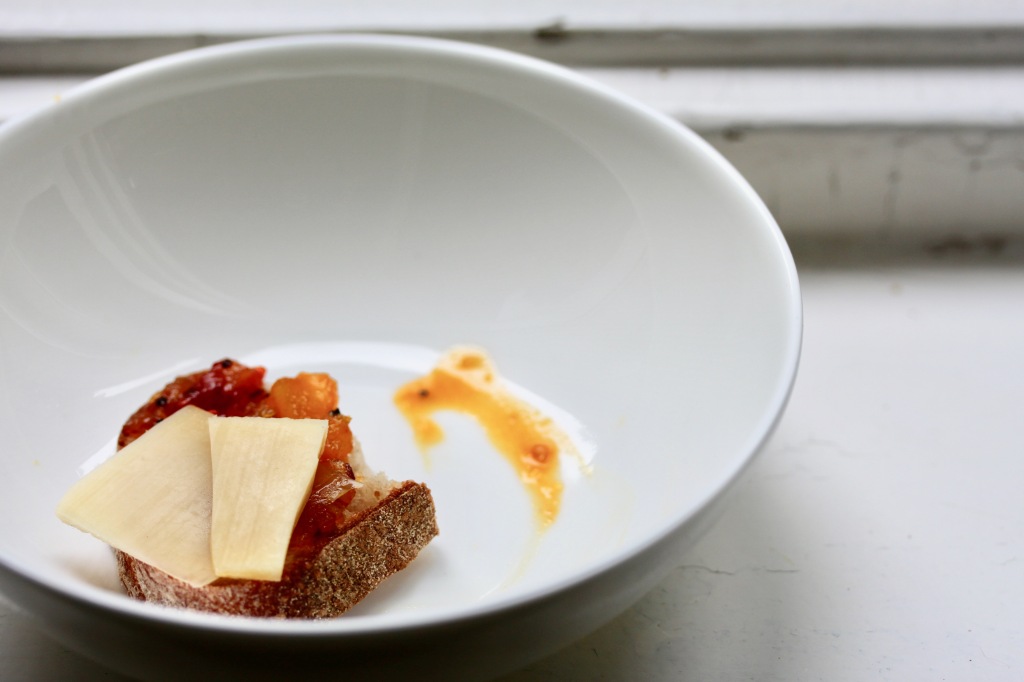
If you’re a person that likes cheese, then this is the recipe for you. This is possibly my most favourite accompaniment to cheese, next to bread and wine of course. I hope this may become yours, too.
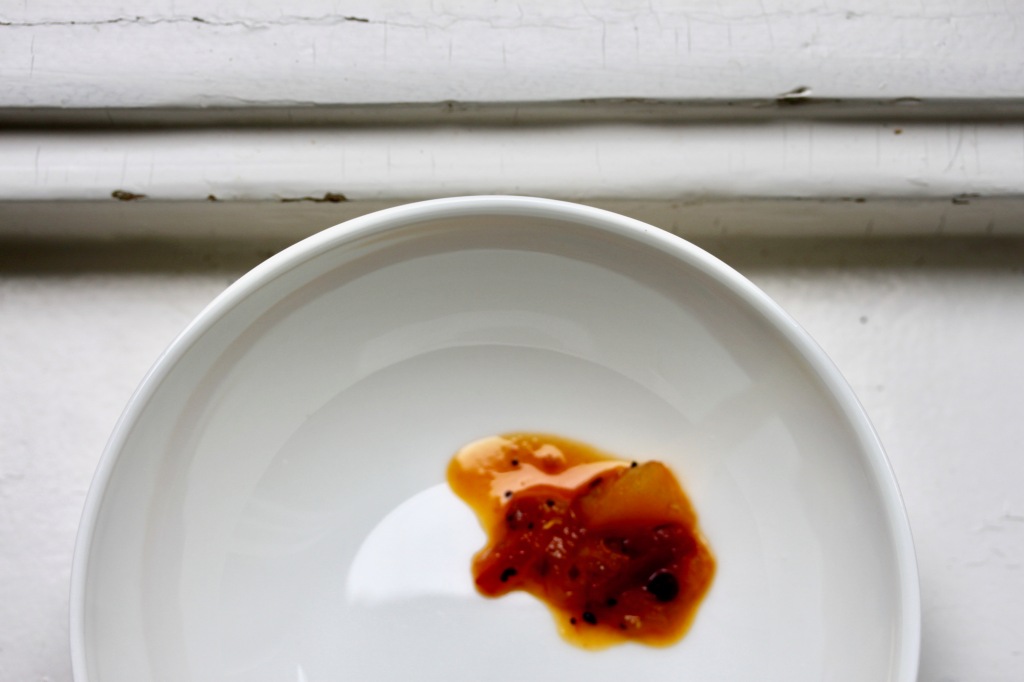
Apple and Tomato Chutney
Makes one large jar
1 Tbsp sunflower oil
½ tsp mustard seeds
½ tsp cumin seeds
½ tsp black peppercorns
½ tsp nigella seeds
2 cloves
1 x 5cm cinnamon stick
½ tsp ground turmeric
½ red chilli, sliced into thin rings (optional)
2cm ginger, grated
1 onion, finely chopped
2 tomatoes, chopped
2 apples, chopped into 1cm cubes
100ml apple cider vinegar
150g white sugar
½ tsp salt
Combine the oil, mustard seeds, cumin seeds, peppercorns, nigella seeds, cloves and cinnamon stick to a small saucepan over a low heat. Once the mustard seeds start popping, add the turmeric, ginger, chilli, and onion, and stir for a few minutes. add the rest of the ingredients and bring to the boil. Cover with a lid and reduce the heat and let it bubble for 20-30 minutes until the apples are soft when pierced with a knife. Depending on the apple, the chunks will keep their shape pretty well, so at this point I like to give everything a rough mash with a potato masher. If the mixture is still a bit too runny, remove the lid and let it reduce a little, making sure to stir it regularly to prevent it from burning. What you want is a thick-ash, jam-like consistency. Transfer to one or two sterilised jars, screw on the lids and let it cool. Once opened, keep it in the fridge. If unopened, it’ll easily keep for a few months.
You are now the owner of the best cheese chutney in the world. You’re absolutely welcome.
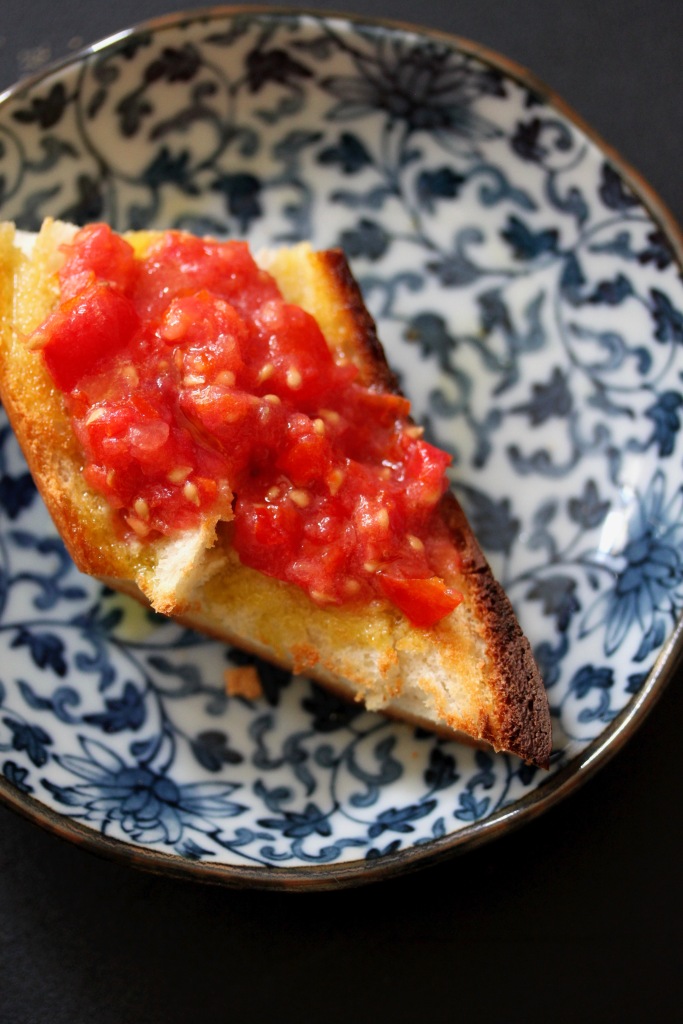
Remember bruschetta? The summery entrée that nobody seems to be doing anymore because most of us can’t be fucked dicing that many – mostly very mediocre – tomatoes. And then when you do make it, and you’re actually kind of proud of yourself, because it is delicious, half of the tomato falls off as you try to take a bite. Also, unless you’re one of those ridiculous people who spends their summers swamped in sweet and fragrant tomatoes (please be my friend), you know good tomatoes are a rare commodity to come by. Well, I’ve put an end to this nonsense. While I’m not here to tell you how to put tomato on toasted bread, I’d like to give you a few pointers in how to get a perfectly crunchy-yet-juicy, non-fall-apart-y bites of bruschetta. All you need is a food processor and a bunch of cherry tomatoes (and garlic and olive oil and a baguette of course). Cherry tomatoes are an obvious (and tasty) all-year-round available alternative to the Mediterranean tomato dream most of us can only fantasise about. The processor takes out the chopping, but also increases the likelihood of tomato on bread permanence. Basically you’re making a chunky-ish tomato soup, then scooping that onto toasty, garlicky olive oily bread.
A word on the blending situation – if you have a food processor, that’s ideal. Somehow the slightly longer blade chops the tomatoes more evenly without immediately turning them into juice, which you often can’t avoid with the shorter blade of the handheld blender. If a hand held blender is all you have though, you can still use that. But just make sure you keep the tomato blitzing to a minimum.
Cherry tomato bruschetta
makes one baguette’s worth of bruschetta
60-70ml extra virgin olive oil
1 fat garlic clove, roughly chopped
pinch of salt
500g cherry tomatoes, washed and halved
½ tsp salt
1 baguette, either sliced into rounds or halved lengthways and cut into 5-8cm squares (especially handy if they mightn’t be eaten immediately)
Combine the olive oil and the garlic clove in your food processor. Pulse a few times until the garlic has dissolved. Transfer to a jar – this can be kept in the fridge for a couple of days, just be aware of its potency! Alternatively, if you can’t stand the flavour of raw garlic, warm the blended garlic oil in a pan until it begins to sizzle. Remove from the heat and let it cool.
Don’t worry about rinsing the blender – add the cherry tomatoes and salt right in and pulse a few times until they’re chopped into an even salsa (but not fully pureed).
Assembly time!
Drizzle the baguette with the oil an toast in the oven at 200°C for a few minutes or until golden at the edges. Alternatively, if you’re like me and can’t be bothered turning on your oven, toast your baguette slices in the toaster, two to four at a time, then schmear with the garlic oil using a brush or a teaspoon. Get a spoon and scoop some of the cherry tomato mixture out of the blender and right onto the bread. You might want to drain some of the juices on the side of the bowl as you scoop, but also bear in mind that the juices are really tasty – you might want to keep it on hand and drizzle a little extra over your bread as you go.
I’m not much of a dessert person. But damn, I most certainly am a dessert person for this little number. The tahini and buttermilk come together beautifully in this very delicate panna cotta. There’s less gelatine in it than in a usual panna cotta, because I never understood the appeal of a bouncy dessert. Soft and almost fall-apart delicate is what we want. This soft, not too sweet panna cotta is nicely complemented with the crunch of chocolate soil, and is lent a nice savoury kick from the salty sesame seasoning. Finally, the orange offsets the dessert’s richness and brings satisfaction to even the most dramatic “I’m too full for dessert, especially if its panna cotta” guests.
Tahini Buttermilk Panna Cotta with Chocolate Soil, Sesame, and Orange
Makes 6-12 servings
2 sheets gelatine
250ml double cream
½ vanilla bean, seeds scraped
40g white sugar
2 Tbsp tahini
250ml buttermilk
Chocolate soil
35g white sugar
35g almond meal
20g flour
15g cocoa powder
pinch of salt
15g butter, melted
Salty sesame seasoning
2 Tbsp sesame
2 pinches salt
2 oranges, segmented – this yields about 20 orange filets
Place the gelatine sheets in a bowl of water and set to the side. Combine the double cream, vanilla, and sugar in a small saucepan and slowly bring to a simmer. Stir in the tahini and stir for half a minute. Squeeze out rehydrated gelatine sheets and add whisk into the mixture. Pour in the buttermilk and stir until well combined. Pour into prepared cups, glasses, or bowls, or whatever tiny vessel you have hanging around. Refrigerate for 2-4 hours until set.
Meanwhile, prepare the chocolate soil. Preheat the oven to 150°C. Combine the dry ingredients in a bowl, then stir in the melted butter until the butter is evenly distributed and the mixture looks mealy. Spread over a lined baking tray and bake for 15 minutes, stirring every 5 minutes. Cool, then store in an airtight container.
For the sesame seasoning, toast the sesame seeds in a small pan over low heat until golden. Cool, then grind roughly with the salt. Set aside. For serving, either leave the panna cotta in the cups / glasses / bowls or upend them onto dessert plates. If you’re into those half-moon shapes I made, simply run a knife through the middle and around the edge of each panna cotta-filled glass and gently scoop each half out with a tablespoon. You can wodge any bits you missed under the panna cotta – you won’t see them after you’ve had a go with the chocolate soil. Nestle two orange filets next to each and sprinkle a teaspoon of chocolate soil between the two. top off with 1/3 of a teaspoon of the sesame seasoning. Serve.
It is pumpkin season and it is time to cook those suckers up before you realise you’ve had enough pumpkin to last you another decade. There are many, many ways of making a successful pumpkin soup, and these versions I’ve offered here are just two of them. The first is inspired by the flavours of the eternal crowd pleaser known as butter chicken, or murgh makhani. However, since it contains neither chicken nor butter, and for lack of a better name, I’ll call it my Indian-inspired pumpkin soup for now. Close on the heels of the first, the second soup is a nod to one of my other all-time favourite flavour combinations, the zingy hot and sour tom kha soup, which, if not for tradition’s sake, will be known as the Thai-inspired pumpkin soup in this series. Enjoy.
Pumpkin Soup – two ways
Serves 4
Pumpkin base
A splash of neutral-tasting oil
1 onion, chopped
2 cloves of garlic, roughly chopped
8cm of ginger, finely grated
½ – 1 small chilli, thinly sliced
1.5 kg pumpkin
1 litre of veggie / chicken / beef stock
Indian
2 tsp garam masala
1 tsp ground cinnamon
1 tsp cumin
8 cardamom pods, seeds removed and ground
2 Tbsp tomato paste
200ml thick cream (plus extra, if needed)
soy sauce / salt
To serve
200g Greek yoghurt
50g roasted cashews, chopped
sweet paprika, to sprinkle
Thai
3 lemongrass stalks, bruised
8 kaffir lime leaves
200ml coconut milk (plus extra, if needed)
1-2 fresh limes, juice, to taste
1 bunch coriander, chopped
Fish sauce / soy sauce / salt
To serve
A few extra tablespoons of coconut milk
A few extra coriander leaves
A few extra slices of chilli
To start off, add the oil and the onion to a big pot and fry on medium heat until translucent. Add the garlic, ginger and chilli and stir for a minute.
Indian
Add all the spices and the tomato paste, and stir for another minute. Add the pumpkin and the stock, and bring to a boil. Simmer until the pumpkin is soft.
Remove from the heat, adding the cream, and puree with a hand-held blender. Season to taste with the salty substance of your choice.
To serve, ladle into bowls, swirl with some Greek yoghurt and scatter with some cashews and a few pinches of paprika.
Thai
Add the lemongrass and kaffir lime leaves, along with the pumpkin and stock and bring to a boil. Simmer until the pumpkin is soft.
Remove from the heat, adding the coconut milk and coriander , and puree with a hand-held blender. Season to taste with the salty substance of your choice.
To serve, ladle into bowls, swirl with some coconut milk and scatter with some coriander leaves and chilli rings.
Serve either soup with bread or rice or whatever you’d like to have it with.
Ever felt like soup in spring? Yeah, maybe not. But maybe you totally do? Maybe you really love soup, especially now, around Easter, when you can’t bear to look another chocolate bunny in the eye. Then my dear friend, this tangy and aromatic tomato and lentil soup might just be the thing for you. It’s wonderful on its own, but I especially love it with some crusty bread slathered with some cream cheese.
As with most recipes, this is more of a blueprint than anything else. As long as you have the rasam powder, you can add and subtract whatever your stomach desires. However, make sure you don’t leave out the toasted coconut – it really completes it.
Rasam powder
Make sure you either have a pestle and mortar or a solid spice grinder to make the rasam powder. The lentils brought my usual grinder to the brink of cracking, so if you’re unsure whether yours will make it, stick to pestle and mortar.¼ cup/ 50g split chickpeas
¼ cup / 50g yellow lentils (or whatever other lentil you have around)
1 cup / 60g coriander seeds
2 Tbsp / 20g cumin
2 tsp black pepper corns
1-2 tsp chilli flakes (go easy on those- remember, you can always spice things up later)
½ tsp asafoetida
2 Tbsp ground fenugreek
2 Tbsp ground turmeric
small handful dried curry leaves
Toast the pulses in a pan until golden and smelling nicely nutty. Cool for a moment then grind with a pestle and mortar or if you’re more one for speed and convenience, a strong blender.
Toast the coriander, cumin, pepper and chilli flakes until a shade darker. Let cool, then grind with the asafoetida, fenugreek, turmeric, and curry leaves.
Combine with the ground pulses and transfer into a lidded jar.
Will keep for a couple of months.
Tomato rasam
5 Tbs desiccated coconut
1-2 tbs ghee or butter
1 tsp mustard seeds
1 tsp cumin seeds
3 garlic cloves, sliced
6-10 dried curry leaves (less if fresh, more if dried)
500g cherry tomatoes, chopped
100g lentils (whatever you’ve got on hand. Just remember they’ll vary in cooking time. I tend to use red lentils for a speedy soup, yellow if I have more time)
1.5 litres of stock
6 tsp rasam powder
half a bunch of coriander, chopped
1 tsp tamarind concentrate, or more to taste
1 tsp brown sugar, to taste
salt, more chilli
In a big pot, toast the coconut until golden. Transfer to a bowl and keep for later.
Melt butter and add mustard and cumin seeds. Let them bubble around until the seeds starts to pop. Add the garlic cloves and the curry leaves, and leave to fry a little longer until the garlic takes on a little bit of colour.
Add the tomatoes, cooking them until mushy.
Add the lentils and the stock, along with the tamarind and rasam powder and bring to a boil. Reduce the heat and cook until the lentils are done. Again, this time can vary from 20 minutes to over an hour. If you’d prefer, you can pre-cook the lentils and add them as the same time as you would the dried ones.
When the lentils are cooked (preferably on the completely soft side, rather than al dente. Who even eats al dente lentils anyway), add the coriander, tamarind, sugar, salt and chilli to taste. Let all of it bubble for about 10 more minutes.
…And what a ridiculously long and pretentious title that is. But really, if you love whisky, and you love the toasted, malty flavours of browned butter and maple, do go make this. However, keep in mind that you need to let the whisky infuse for three days before making this – so if you hurry, you’ll have some by the weekend.
combine the whisky, maple syrup, and bitters in a tumbler. Squeeze the orange rind over the top and drop it in, giving it a bit of a stirry-smash to release some more of its orangey goodness. Add the ice and give it one last stir.
Yum.
Brown Butter Infused Whisky
makes about 500ml
100g butter, cubed
500ml whisky (go for something that’s drinkable on its own, but not sinfully wasteful if mixed into a drink – I used Red Label here)
One 600ml jar with a lid
A coffee filter, a clean tea towel or muslin of some sort
a 500ml bottle, to store the whisky in
Melt the butter in a saucepan over low heat and let it sizzle gently until it smells deliciously nutty and has gone a nice shade of hazelnut brown. This will take a moment or two, but be sure to keep an eye on it, because it can go from brown to black in an instant. Remove from the heat and let it come to room temperature (otherwise it’ll sizzle when it gets into contact with the whisky, and you lose precious alcohol percentage for nothing). Pour the butter and the whisky into the jar, screw on the lid, and give it a good shake. Then, place it into the fridge for three days.
Once those three days are up, filter the whisky into a bottle, using the coffee filter or tea towel. I regretfully don’t like whisky flavoured butter, so I usually discard it. If you’re a fan, please use it. But basically, once you’ve transferred the whisky into the bottle, you’re done! Keep it in the fridge between cocktail – making.